
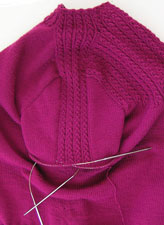
 The second sleeve cap went much faster now that I understand how to work the short rows effectively. The wrapped stitches turned out much neater since the additional stitches helped minimize gaps. I still snugged up the picked up stitches once the cap was done.
As I mentioned in an earlier post, to create these sleeve caps I worked around the armhole in clockwise fashion picking up stitches starting at the top left side of the armhole (just after the shoulder strip), then placing the stitches from the underarm waste yarn onto the needle and finally picking up the stitches along the right edge of the armhole.
The “short” rows are started after working the patterned stitches on the shoulder strip plus knitting five stitches. At this point I wrapped the next stitch, turned to the purl side and worked across until five stitches after the strip and did another wrapped stitch. Rows are increased in this fashion until all but the underarm stitches are worked. I started working the sleeve in the round when the last stitches on the left and right were wrapped. I hid these last two wrapped stitches on the first row that was worked in the round.
It’s odd to call these wrapped “short” rows because in this instance the rows begin short and get longer as the picked up stitches are worked.
Why wrap the stitches? All the books I read said that wraps help keep the stitches tight otherwise gaps will form.
Want to see how to wrap stitches?
Knit Wrap

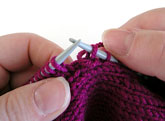
Knit to the turning point. For my sweater the first turning point is five stitches past the shoulder strap. Slip the next stitch on the left needle to the right needle.
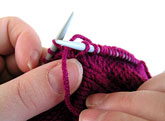
Bring the working yarn between the needles to the knit side. Slip the stitch on the right needle back to the left needle.
Take the working yarn between the needles back to the purl side. Now turn the garment to the purl side. Purl the next stitch on the left needle remembering to keep the working yarn tight (note that the wrapped stitch is on the right needle). Purl to the next turning point.
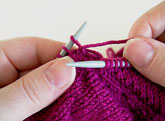
Purl Wrap
At the turning point, slip the stitch on the left needle to the right needle.

Move the working yarn between the needles to the knit side. Slip the stitch on the right needle back to the left needle.

Bring the working yarn between the needles to the purl side. The slipped stitch is now wrapped.
Turn the garment so that the knit side is facing. Knit the next stitch on the left needle pulling tightly on the working yarn (note that the slipped stitch is on the right needle).
Now knit to the next turning point. The last stitch will be a wrapped stitch.
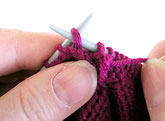
Hide Wrap from Knit Side

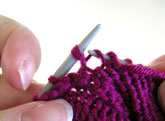
I like to hide the wrap by knitting the wrap with the stitch it is wrapping. Put the tip of the needle under the wrap and then under the leg of the stitch.

Knit the wrap and the stitch together.
Now that the wrap is hidden proceed with wrapping the stitch on the left needle as described above. Once the stitch is wrapped turn the garment to the purl side and purl to the next turning point.
Hide Wrap from Purl Side
The last stitch on this purl row will be a wrapped stitch. To hide the wrap, put the tip of the needle under the wrap from the back and then pick up the stitch leg.
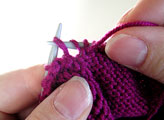
Purl the stitch and wrap together.

i just used short rows to bind of the armholes on a sweater i’m knitting. so much neater than the regular jagged bind off, i’m hoping it will be easier to sew up 🙂
LikeLike
Great photos!
LikeLike
Vanessa,
That’s a good idea. I’d be interested in finding out how that works for you.
Krista Jo,
Thanks. Photography is quickly becoming my other hobby. Lately I’ve been trying to improve my photography skills by reading books on Photoshop and digital cameras.
Right now I’m having trouble taking indoor photos at night. I’ve been trying to use various lights around the house but think I’ll need to invest in some flood lights.
LikeLike
Thank you!!! I was on the verge of tears trying to figure out the right way to hide the wraps on the purl side. This is excellent. Thanks so much.
I’ve been meaning to say “hi” to you anyway since I’m also in Seattle.
Hi!
LikeLike
Jessica,
It’s always good to hear when a post helps someone else, thanks.
I also had to do a little searching to find how to hide purl side wraps. Many of the reference books seem to gloss over this step.
Do you go to any SnB type meetings in Seattle? I heard that some knitters meet at Third Place Books on Saturday afternoon but haven’t had a chance to stop by and see.
LikeLike
Hi, I’m one of the knitters who meets at Third Place Books on Saturday afternoon. Please feel free to come by – we meet up in Lake Forest Park around 1:00-4:00 every week. Sometimes we bring our wheels, too!
LikeLike
THANK YOU!!! I’ve been on the verge of tears today trying to find an explanation of wrapped stitches with pictures. I understood the theory but couldn’t understand how the wrap would look better than a hole. I didn’t even know they could be hidden! You are a life saver!
Thank you!!
LikeLike
Thank you so much for taking the time to explain short row set in sleeves. I had a question (or two).
How do you determine how many stitches to pick up around the armhole?
How do you determine how many stitches to knit the first row?
After the first row you pick up 1 stitch on each side on every row until all stitches have been picked up, right?
Thanks again! -Page
LikeLike
I’m working in entralac for the FIRST time. I’m to the point where I need to “pick up stiches” in purl on the WS and have never picked up stiches before. Can anybody out there help me???? Thank you.
LikeLike
Thanks so much for the pictures! I had read 4 other explainations and still couldn’t specifically figure it out. -Kristin
LikeLike
I too was ultra frustrated at my apparent inability to complete the purl pick-up row. I just did it and it looks fabulous. I am working on the shapely tank by whiteliesdesigns.com.
LikeLike
There’s also a group of knitters (some ample, some not) that meet every other Wed at the Q-Cafe (www.qcafe.org) west of Queen Anne off of 15th Avenue NW. 6-9 pm. Next meet July 20, special meet 07/13 (tonight).
Joyce
LikeLike
Thank you so much for such a great, informative post! With pictures! I’m knitting my first sweater, and the instructions said
“K across right shoulder sts, picking up wraps from short rows and knitting together with corresponding sts, continue across back neck and left shoulder sts, turn.”
and while I’ve done short row-heavy patterns before, I’d never encountered the “pick up wraps” instruction before. (I found you via Google.)
Happy knitting!
LikeLike
Oh my goodness! You totally just saved me! Thank you so much for the great post with pictures. I’m working on an Aran Afghan and have never done short rows before. I was totally confused by the directions. Thanks again! I too found you via Google. 🙂
LikeLike
My question is how do I handle the 1st knit round when knitting the in the round, and after makeing a few short rounds knitting back and forth. I am fine coming across the rows I have wrapped from the knit side – but when I encounter the rows previously wrapped on the purl side (and approaching from the knit side now) the wraps are on the opposite side of the stitch. Help?
LikeLike
I am doing Audrey in Unst and it calls for the short row sleeve cap, but also said do not pick up the wraps. Think the ideas was a design element. I followed the design element, however the knit wraps do not look the same as the purl wraps. So the right front and the left front do not match in look. Suggests
LikeLike
thanks for “hiding wrap” pics and detailed explanation. I just started a pattern where this term was used with no explanation. Appreciate you sharing your knowledge.
Jen A.
Walker, MI, USA
LikeLike
That’s awesome nice. I am doing Audrey in Unst and it calls for the short row sleeve cap, but also said do not pick up the wraps.
LikeLike