
 As I write this entry I’m listening to French hip-hop rap accordion music by Java. I acquired this unique CD after listening to an NPR music review while on the way home from a Java programming class a couple years ago. At that time, I appreciated the music as well as the coincidence between the group’s name and my choice of programming languages.
This morning I noticed that the coincidences continue. The woman on the cover is holding knitting needles and yarn although she doesn’t appear to actually know how to knit. On the back cover there’s a picture of her grasping the needles in an “X” position and the yarn is draped around the needles in a tangled mess. Not to take this too seriously, but it’s funny how others perceive knitting as only a kitschy thing. I guess we can blame that on knitted toilet paper covers and the like.
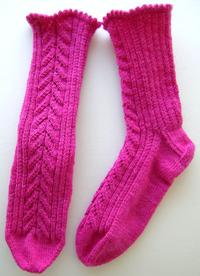
Here are the completed socks. I’ll be giving them to Lily in a couple of weeks and hope to get better photos then.
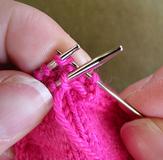
Since I started from the cuff I had to close the toes using the Kitchener stitch. I can never remember how to do this from memory so I decided to capture pictures of the process.
Kitchener Stitch
I learned how to weave the toe from the Ann Norling Basic Adult Socks pattern.
I cut the running thread (leaving enough yarn to weave the toe) and thread it onto a tapestry needle. Position the stitches onto the tip of two knitting needles, holding the needles parallel to one another. The running thread is on the back needle.
 Take the tapestry needle and insert it into the first stitch on the front knitting needle knitwise. Transfer the stitch from the knitting needle to the tapestry needle.
 With the first stitch still on the tapestry needle, insert it into the next stitch on the front needle purlwise. Pull the thread through both stitches.
 Keeping the thread under the knitting needles, insert the tapestry needle into the first stitch on the back knitting needle purlwise. Transfer this stitch from the knitting needle to the tapestry needle.
 Insert the tapestry needle into the second stitch on the back knitting needle knitwise. Pull the thread through both stitches.
Repeat these four steps until all but two stitches are left. Now, insert the tapestry needle into the last stitch on the front knitting needle knitwise and transfer it to the tapestry needle. Insert the tapestry needle purlwise into the last stitch on the back knitting needle and pull the thread through both stitches.
If the stitches are uneven, adjust the stitches with the tip of a knitting needle. Start on the side opposite of the running thread and tug at the side of each consecutive stitch, transferring any slack from one stitch to another. Eventually any slack will end up on the last stitch, which can be tightened by pulling on the running thread.
Now, pull the running thread to the backside of the sock and weave in the end.


Ab-fab socks. I like the way that the cable runs down the front, but I especially love that Picot edging on the top. Would you please (oh pretty please) tell us how to get that edging? Hmmm, could be a great addition to the Techniques section….
LikeLike
Samina, sure I can add it to my techniques but probably can’t do it until this weekend.
Last weekend I checked out “The Knitter’s Handy Book of Patterns” by Ann Budd from the library and noticed that she describes how to do this.
The picot edge is really easy. Here’s a quick description. Just be sure you do it on an even number of stitches.
1. Do a provisional cast on. I do this by making a crochet chain and then picking up stitches around the chain.
2. Knit a few rows.
3. Work a row of *knit two together, yarn over; repeat from *.
4. Knit a few more rows of knit stitches (equal to the number of rows you did in step 2).
5. Fold the cast on edge toward the purl side and knit each stitch on the needle with a stitch from the provisional cast on.
Ann Budd’s book mentions that it’s a good idea to knit this edge with a needle one size smaller than the one used for the rest of the sock. I didn’t do that with these socks but probably should have.
LikeLike
Samina,
I have the picture done and will post the directions soon.
LikeLike
I’ve made eight pairs of socks and up until have not been able to master the perfect Kitchener Stitch. Thanks for your excellent photos and clear directions. I was following the instructions from the same Ann Budd book, but your instructions were slightly different. It was a Eureka! moment. It was driving me crazy – not knowing why I couldn’t get my Kitchener stitch to look perfect. I’ll never look back again.
LikeLike
I have the books, I’ve tried to read and follow kitchener stitch before without much success. I just did it following your simple and easy pictorial. Thank you!
LikeLike
Bliss & Leah,
I’m glad that I could help out. Kitchener is one of those knitting skills that once mastered, make you feel like you can do anything.
LikeLike
Gorgeous Socks and fantastic Kitchener stitch instructions. I am a beginner knitter, trying to teach myself and I have been trawling the web for instructions I can follow, with little success. Yours are great; clear and quite beautiful with those photos.
You can tell how little clue I had by the way I startled my husband by yelling out “Oh! I need a tapestry needle too”. (Well, I have to start somewhere.)
Its probably something best learned while watching someone do it then playing with it yourself, but I have noone to ask. These lovely pictures go a long way way toward that.
Thankyou
Megan
LikeLike
Megan,
Yes, it’s much easier to learn from somebody but I’m glad that the photos helped.
LikeLike
Thanks so much for posting such detailed explanations. I’ve been knitting forever and only now knit socks where I needed this stitch. I searched the web and your instructions and photos were the best I found!
Thanks again. I’ve linked to your site as one of my faves, from my blog http://underdutchskies.typepad.com/
LikeLike
Megan –
Thank you so much for the quick refresher on the kitchener stitch. I’m heading to the airport soon for a 16 hour flight and planned on knitting at least 1 pair of socks by arrival time. Without your help, I would have been “at loose ends!” (Or maybe wits in my case…) Will have to check your site out for more helpful tips!
LikeLike
this was very helpful thank you ! just commplete my first sock !
LikeLike
I am just starting to knit again. I found some yarn that had a lot of texture and is very light weight….so I am knitting two at the same time. Since the look is so textural, I am knitting on one side and purling on the other….very plain. Now that I am almost finished, I think that the throw needs a decorative edge. Could you suggest something? I though picot, but now, I am thinking something a little more decorative…even crocheted. Hope that you can help me. Marla
LikeLike
just used you kitchener stitch for the first time and loved it.
LikeLike
What sock pattern is this…it is beautiful. Would love to try it!!
LikeLike
Thanks for the easy to understand instructions.
LikeLike
I don’t do socks very often so whenever I have to do the Kitchener stitch I have to haul out book — until today with I found your wonderful, wonderful instructions. Of all the instructions I have ever read for this — these are the BEST! Thanks so much for posting them.
LikeLike
Hi, I’ve found your site to be the source of really clear knitting advice, especially the figure-eight cast on. Thanks.
Noticed the socks you’d knit in this blog & thought, Oooooh! So I dug out some denim blue yarn from my stash & tried to copy the pattern from looking at your pictures. They’re going well so far. Not an exact copy, but who cares.
LikeLike
This is so useful – mine never looks this neat!
LikeLike
How do you do Kitchener stitch with a pattern that has 2 knits and 2 purls and a slip stitch on each end? I am trying to join to pieces of a scarf that have been knitted separately because of beading at the ends.
LikeLike
I’m on my second pair of socks and this is the first time the directions for the Kitchener stitch made any sense. Thanks. I live in the frozen north where warm socks are a must. d d
LikeLike