 The v-neck pullover should have been finished long ago but I’ve been stuck trying to figure out what to do with the ribbing around the body and wrists.
Like the previous three sweaters, this one was started with a provisional cast-on with the assumption that I would later work the ribbing in the opposite direction and finished it with an invisible bind off. But unfortunately I wasn’t fully aware that when stitches are worked in the opposite direction they end up being 1/2 stitch off of the ones going in the other direction. If I forge ahead and working the ribbing as “planned” some of my knit and purl stitches will not line up with the ones on the rib. If I want the stitches to properly line up I’ll have to graft the ribbing to the body. What a daunting task!
Jean suggested making swatches out of a lighter yarn and practicing before attempting the feat.
So without much of an idea of what to do I made my swatches and fiddled around with them for a few days. Luckily Michale saw me struggling to come up with a solution and came to my rescue with her copy of Lucy Neatby’s DVD. Lucy has an interesting technique that makes grafting look easy. Basically she knits beyond the edge of the pieces with waste yarn and then holding the to-be-grafted rows together uses the stitches on the waste yarn as a guide to graft a new row of stitches. I’m going to adopt this technique but adjusted it a bit to suite my circumstance.
To start, I worked the 1×1 rib as usual minus one row. The last row was then worked in a light colored slippery yarn (white). The next two rows were worked in a third color (green) with the same pattern as the body before switching to stockinette stitch.
Now I’m all set to start grafting. The row of white stitches will serve as my guide. I’ll thread my darning needle with a piece of purple yarn (used for the body and cuff) and then start stitching close to the white thread, creating a new row of stitches as I go. I’ll mimic the stitches as they enter and exit the green waste yarn and then ribbing. Where ever the white yarn enter/exits a stitch in the green waste yarn, I’ll do the same with the stitches on the sleeve and likewise with the ribbing side. After all stitches have been grafted I’ll remove the white and green yarn.
Wish me luck. I’ll be sure to give an update on how it turns out.

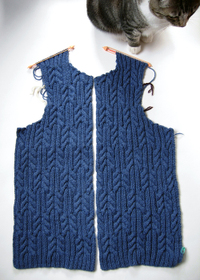
Darn cat, I can’t seem to keep her off of the round neck cardigan while it dries.

Great job at forging ahead with the grafting! I will have to do that as well with my v-neck pullover. I have been avoiding it like the plague! Sorry to have missed you Thursday night – that is when the flu really hit hard. Still battling it but feeling better.
Your round-neck cardi looks fab!! How is it that you are a member of the slow knitter group? 🙂
LikeLike
I need to watch the two DVDs of Lucy’s I own and buy the rest. I ended up in one of her classes at Madrona when my original instructor got sick. Lucy not only knows or has figured out lots of very clever techniques, but she communicates them extremely well.
Both those sweaters Look like they’ll be lovely and very wearable when done.I hope the course felt worth all the work. And I’m glad I decided with very little though that I couldn’t fit it in.
LikeLike
I am enjoying your course updates so much.
The cardigan looks so good.
I would think your course is giving you so many different options for doing knitting, I am jealous of that. But when it’s over you would choose what to incorporate into your own projects.
P.S. I have Lucy Neatby’s ‘Fiesta Vest’ pattern. 6 pages long, she is a meticulous pattern writer, I like that!
LikeLike
Just curious: are you holding the extended ribbing in front of the body, or behind, as you’re grafting?
LikeLike
I love the way cats have to sit at an angle to things, like they want to keep an eye on them but they don’t want to fully commit.
LikeLike
You. Are. Amazing.
LikeLike
The cardigan is looking really nice. I’m loving that blue.
Good luck with the grafting. Take it slow to begin with. After a while you’ll work up a rhythm it it will go quickly. You might also want to work the stitches a little loose, and then go back and make them match the rest of your stitches. Graft a few inches, then fix, and repeat till you’re done.
I’m looking forward to seeing how both projects finish up!
LikeLike