
Want to learn how to do short row heels?
If you are really serious about learning this technique I would suggest getting a copy of “Simple Socks Plain and Fancy”
by Priscilla A. Gibson-Roberts. This book has a wealth of information, from sizing for any gauge to various design ideas. Her detailed instructions are very well written.
1. Purl side

This heel is worked on half of the total number of stitches.
First Row: Knit to the last stitch of the row leaving the last stitch on the left needle.
Second Row: Turn to purl side and take working yarn to the back between the needles. Purl first stitch on left needle.
The photo to the left shows the beginning of the first purl stitch with the working yarn coming from the back.
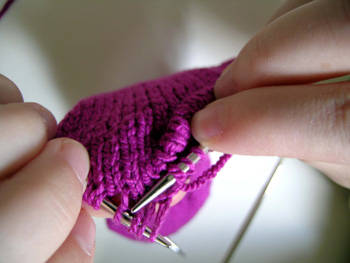
2. Purl side

Second Row (cont.): This photo shows the working yarn being wrapped around the right needle. Notice that the working yarn comes from the back of the work, which will create an extra stitch (yarn-over) along with the purl stitch.
3. Purl side
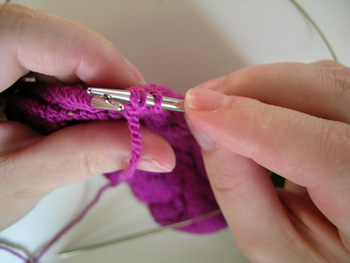
Second Row (cont.): Once the purl stitch is completed, the right needle will now have three loops. The first (from right) is the first unworked stitch, the next one is a yarn-over and the third is the just completed purl stitch.
Continue to purl all but the last stitch on the left needle and turn to the knit side.
4. Knit side

Second Row (cont.): Once the purl stitch is completed, the right needle will now have three loops. The first (from right) is the first unworked stitch, the next one is a yarn-over and the third is the just completed purl stitch.
Continue to purl all but the last stitch on the left needle and turn to the knit side.
5. Knit side

Third Row (cont.): There are now three loops on the right needle; the first (from right) is the unworked stitch, the second is the yarn-over and the third is the newly created knit stitch.
Now knit the rest of the stitches on the left needle until you reach the first stitch/yarn-over pair. Turn and repeat steps from page 1 until …
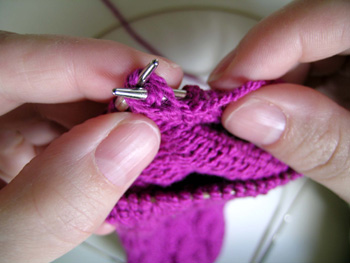
6. Knit side
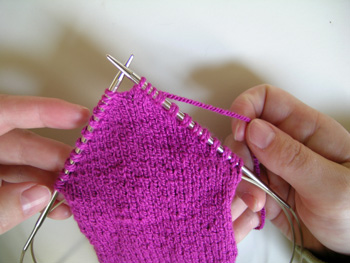
… there are six unworked stitches (or however many you choose) between the sloped edges. I recommend looking at the “Simple Socks” book to figure out how many stitches should be unworked. It really depends on the sock size.
This photo shows the first half of the heel after all rows have been worked. Notice that there are stitch/yarn-over pairs on each needle. Now that we are at the halfway point the rows will start to get longer to work all those remaining stitches.
Knit to up to the first yarn-over loop and knit it together with the next stitch. Turn to the purl side.
7. Purl side
Work purl side yarn over as describe on pages 1 – 3 and then purl up to the first yarn over loop.
Now work this loop with the next stitch using SSP (slip two stitches on left needle knitwise onto the right needle and then slip them back to the right needle. The stitch mounts have now been reversed.
Place right needle through back loops of these stitches (on right needle) from left to right and purl the stitches together. This is an awkward step. Look at the picture. My right needle was first placed through the back loop of the second stitch on the left needle and then through the first stitch on the left needle before I purled the stitches. I think of it as a backward purl.
Turn to the knit side. Work a yarn-over as described on pages 4 & 5. After working a knit side yarn-over, knit to the first-yarn over on the left needle.
8. Knit side

When you get to the first yarn-over notice that this yarn-over and the next stitch are sitting on the needle backwards (the front of the loop hangs to the left). Reposition these stitches so the front loop hangs to the right. If you don’t you’ll end up crossing the stitches.
To reposition the stitches, slip the next two stitches from the left needle to the right needle purlwise and then carefully slip them back to the left needle one at a time, so that the front of the loops hang to the right.
The next photo will show what the repositioned stitches should look like.
9. Knit side
Now that the first two stitches are sitting correctly on the left needle, knit the next three stitches on the left needle together. Turn to the purl side and work another yarn-over as described previously. Purl the rest of the stitches up to the next yarn-over.
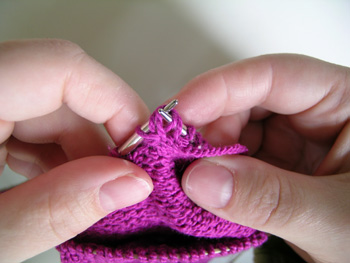
10. Purl side

Once you’ve worked the purl row up to the next yarn-over on the left needle, you’ll work a SSSP using the next three stitches on the left needle.
Slip the next three stitches on the left needle onto the right needle one at a time knitwise. Slip all three stitches back to the left needle now that the stitch mounts have been switched.
The picture shows the three slipped stitches sitting on the right needle. These stitches are then slipped back to the left needle.
11. Purl side
Here’s the tricky part. Now that the three stitches have been slipped back to the left needle, purl these three stitches together. To accomplish this, I flip the left needle forward a bit so that I can place the right needle into all three stitches from left to right.
Yes it’s a bit awkward, but once you’ve done it a few times it will get easier.
12. Purl side
Here’s what the purl part of SSSP looks like once the left needle is through all three stitches on the left needle and the working thread has been wrapped around the right needle.
Once the decrease is completed, turn to the knit side. Work back and forth across the remaining stitches until all the yarn-over/stitch pairs are worked (repeat steps on page 8 – 12).
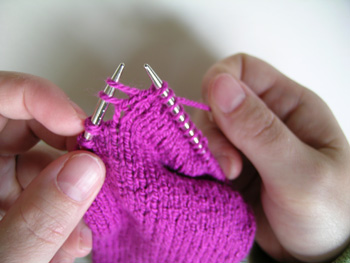
13. Done
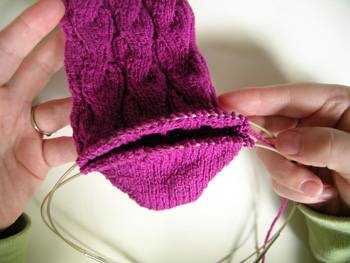
Here’s what the heel looks like once all the stitches are worked.
When all the stitches on the heel needle(s) have been worked there should be yarn-overs on each side of heel needle(s). Decrease these yarn-overs with a stitch from the instep needle(s). Now continue knitting in the round. I suggest counting stitches to make sure you still have the right amount.
I wrote this brief “tutorial” to give fellow socknitters a quick overview of how to work short row heels. As I mentioned previously, I suggest finding a copy of “Simple Socks Plain and Fancy” by Priscilla A. Gibson-Roberts for more detailed instructions.
