Minimizing accessories

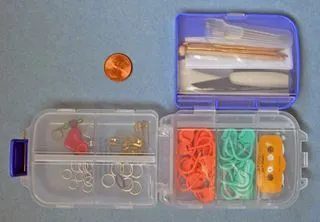
Not too long ago I down sized my carry along gadget box into this nifty folca box.

Folca_closed

This compact box unfolds to reveal many compartments. Including one that long enough for small Japanese snips, darning needles and a mini crochet hook.

Folca_open

One thing I’d really like to add is a manual row counter. The usual row counters like the katcha-katcha or the barrel ones are just too big.

Recently I was thinking about this dilemma and remembered a counter that came along with some knitting needles and supplies I inherited a few years ago.

Knit_count


This small flat counter  fits perfectly into my box but unfortunately some of the numbers have worn off.

This weekend searched the internet hoping to find a new one. My searches on Ebay and Google didn’t bring up any sources. When I search the by patent number and found this. The patent was filed in 1941! I had no idea it was that old. Looking at the diagrams revealed that the holes on the underside are there so that it can be slipped onto a needle. It’s got to be the predecessor of the barrel counter.

At this point I have no hopes of ever finding another one.

Here’s  a picture of the Aran.

Aran_almost_done

Although it’s not done, it is ready for the next class … when we’ll learn how to sew in the sleeves.

I asked Jean why the saddle is about 1cm off center of the shoulder (more towards the front). She said it’s to compensate for how the garment tends shift backwards on the shoulders

Another organizer

Gadget boxLike many knitters I’m always on the lookout for the perfect gadget holder. Here’s my latest find. Small enough to fit in my knitting bag but big enough to hold all my stitch markers, darning needles and a pair of folding scissors. Everything is safely stored in its individually covered  compartment. No more worries about spilling all those tiny pieces!

I got mine at Restoration Hardware (with fishing tackle included) but did an Internet search and found them at Cabela’s, minus the fishing stuff.

Over the past week I focused on getting the green top-down pullover finished.

When I last worked on it only the neck was left to do. I planned on a simple roll-neck version which in my mine should have only taken a hour at the most. However, without going into much detail, it wasn’t so simple. I have a knack for making such things way more difficult than they should be. Of course after  knitting several different versions I put the thing aside and swore I was going to leave it as is and not change a thing. It was time to move on.

A few weeks have passed and I started getting curious about those tight sleeves. I tried on the sweater again and the sleeves seemed even tighter than before. There was no question in my mind. The sleeves had to be rip out reknit with 2cm added to the width. That’s what I’m doing now.


Found!

Woollyboard

I guess if you have patience and look hard enough you’ll eventually find what you’ve been seeking.

I was very lucky to find this Woolly Board II for the bargain basement price of $10. However, shipping from the East coast was another $35.

It’s made of finished poplar wood. All the pieces come apart and are stored in a handy cloth bag. It came with instructions but didn’t include any indication of who made it. My guess would be that it was made in the early or mid 90’s when Ms. Starmore’s books were still in circulation. The instructions refer to the woolly board shown in Stillwater.

Giving new life to an old planner

Needlebinderinside_1I did a little more rummaging around at the thrift store and found a decent looking binder for my needles. It’s amazing what one can find in that store. I’m recycling this old Franklin Covey planner cover into a binder for my needles. A little scrub down with leather cleaner and it looks almost new. The detachable shoulder strap is a bonus.

For any of you out there that are also looking at various binder alternatives, I noticed that these binder pages from Knit Picks can fit into  8.5″ X 5.5″ binder. Just stagger them until the holes line up into the rings. I also tried this with a normal sized 3 ring binder and voila, the pages can also be made to fit one of those.

I did make steady progress on Firebirds this week. Here’s a photo of the back. Notice how that birds on the left face left and the ones on the right face right? I love this detail of the design. For now I’ve stuck with the pattern hoping all will work out well when I dress the sweater on a woolly board. On the next row the steeks for the armholes will be started.

Ss_socks_yarnEven though it’s hard to put Firbirds down, yesterday I started winding yarn for another sock project. Although I generally knit one item at a time, I’m itching to take on another more portable one.

Working with two hand painted yarn colors on my last sock project was so enjoyable that I want to explore similar possibilities. So my next little project will be the Sunrise-Sunset Socks from Big Girl Knits.

A few changes

Body3repeatsKnitting on Firebirds continues as usual, with a pace of about one lengthwise repeat per week.

Previously I mentioned that I was going to shorten the sweater by one repeat. Well, plans have changed after taking a moment to check my tension.

While my stitch tension seems to be fine (~7 sts per inch), I found that my row tensions is off a bit. I’m knitting 8.43 rows per inch while the pattern calls for 8 rows per inch. Yikes! that’s going to make the sweater about one inch shorter.

I’ve gotten squeamish about shortening the sweater one whole repeat. That would be 3.5 inches, which seems too much. At the same time I’m also concerned about the width. As I’ve been contemplating this dilemma, I remembered hearing the teacher in a beginning knitting class say that you can always block a sweater so it’s wider or longer but not both. With that in mind, I’ll go ahead and knit all seven lengthwise repeats and try to stretch the sweater out an inch with a woolly board.

Besides worrying about the overall length, I also started thinking about how my row tension could affect other parts of the sweater; specifically the armholes and neckline. The difference in row gauge means that I’ll need to start the armhole steeks a few rows sooner so that the length of the armhole matches the length specified in the pattern. However, no adjustments for the neck opening will be needed. After doing a bit of math, I found that the tension differences won’t make enough of a difference to merit adjustments.

Chart_marking_tapeOn another note, I was at the fabric store yesterday checking out fabrics to cover my needle binder and found these tapes near the  rulers used by quilters. Apparently, quilters use them to mark off frequently used measurements on their rulers. When I saw them I though, wow I could use those for marking my knitting chart for my current project.

My first attempt started with a piece of blue tape from “Tape Go Round”; the funny tape dispenser with six little tape rolls. It didn’t take long before I found out this tape wasn’t going to work. When I tried to move it to another row it didn’t come off very easily and started tearing my paper chart.

Next I used one of the tapes called “Glow-Line Tape”. This tape was about $1 cheaper with couple more yards of tape. This one worked much better but oddly isn’t quite tacky enough to last more than a couple of rows.

I ‘m considering going back to good old Post-it notes.

DIY needle binder

Ring_binder_parts_1My new KnitPicks needles are working out great. Now I just have to keep them organized.

My other circular needles are in one of those large soft-sided fishing tackle cases.  It works well but has been bulging at the seams for some time now. It’s way too bulky to take to classes and I’m not so crazy about the fishing logo on the front. Clearly these new needles need another home.

I like the binder idea that KnitPicks uses for their case but didn’t buy the cover. I was hoping that I could just buy some of the needle pockets to use with my old day planner.  Turns out that the needle pockets are much smaller than my old day planner and have six oddly spaced holes. After visiting an office supply store and comparing the needle pockets with other planners I soon found that the hole configuration will fit binder mechanisms with six rings but that planners using these types of rings are not wide enough to hold the needle pockets.

Not daunted by this, I headed over to a local thrift shop and sifted through the mounds of unwanted planners and binders. After a few minutes I found one with rings in good shape and the right price – $.69. When I got home I tore the binder mechanism out of the planner and started thinking about how to make a cover and secure the mechanism to the cover.

I quickly recalled finding a nifty binders called Rebinder that is made so that the cover can be easily replaced. Hoping to use this same idea to fasten my binder mechanism to a cover, I looked closely at the parts and headed over to the hardware store.  Bolts

Here’s what I found. The nuts are called t-nuts, tee nuts or blind  nuts. They either have prongs that will dig into the item being secured or without prongs but with small holes for brads. My Rebinder has the one with the prongs which dig into the cardboard cover to hold it securely.  These t-nuts come in various sizes. The ones that fit into the holes on my binder mechanism are 6-32. The screws that fit into the holes of the t-nuts are 6-32 x 3/8 machine screws with an oval head for Phillips screw drivers.

Now that I have binder rings and a way to fasten it to a cover, I just have to design and make the cover. Not sure what I’ll do. There are so many possibilities.

In the mean time, I’m still working on Firebirds.

Body2repeats

Progress is a bit slow since I’m trying to make sure all my stitches are even. Parts of the chart have long gaps between color changes, which I think makes it harder to be consistent. I’m trying to remember to weave in unused yarn when knitting through such gaps, hoping this will help.

Bargains

Vancouver
I just returned from a quick weekend trip to Vancouver.

Two wonderful crystal clear days that we in the Northwest cherish and vistors are convinced near appear. Everyone was out strolling along the waterfront or in one of the many scenic parks enjoying the sunshine.

After breakfast we wondered through the Museum of Anthropology and then scooted over to Birkeland Bros. Wool before leaving the city. While I managed to refrain from purchasing some very soft polworth sliver, I did pick up some very reasonably priced Quebecoise wool for a fingerless glove project that has yet to get started. I found out about this place via an article on Vancouver in Spun Magazine. Cara is indeed very friendly and keen to show her stock. Besides plain wool she also carries beautiful hand painted yarns.

Japanese_string_1

On the way up to the city, we made a detour to Daiso. I wanted to see if I could find some of that Japanese string Judith MacKenzie McCuin brought to her classes at the winter retreat. She says it makes great drive bands for lace weight yarn. The package she brought with her was purchased in a Japanese store in San Jose. She mentioned that she hasn’t found it anywhere else including Uwajimaya in Seattle.

When I found out about the Daiso in Richmond, I had a hunch that they might carry it. Last fall while in Tokyo I happened to visit their Harajuku store and was amazed at the abundance of cheap (100 yen) stuff they carried. I was so overwhelmed that I didn’t purchase anything. I just soaked in the the 100 yen experience.

Once again I felt overwhelmed. Much like in Japan, there were people everywhere in the tiny isles. It took a bit of searching but I finally found several different packages tucked away in two different places. I first spotted it in the sewing section near the pins, needles and etc. Next to it was another package of similar string, but this one had an English label that said it was “kite string”. I also found some, with yet different packaging, in the kitchen paper wear section next to the picnic supplies.

This week I’ll give it a try while I attempt to finish my cotton samples from Judith’s last class on spinning cotton.

During the search for string, I happened to find this small counter that records up to 999. What a bargain – only 2 Canadian Dollars. The Kacha-Kacha’s from Clover run about 10 US dollars and only count to 99.

Counter

Love the packaging. Looks like it can be used to entertain blond headed siblings that love to see who can count the most cars or birds.

Managing a lace chart

The Seaweed Scarf is coming along much more quickly than anticipated now that I’ve found an efficient way to follow the chart. This small notebook that I created holds a page for every charted row. When I’m done with a row I flip to the Chart_notebook_closed next page which has the current row highlighted.

I chose to display all rows on each page so that I can easily “read” the previous row on the knitted piece. This is handy when figuring out if a mistake was made on a previous row. I also put a sticky note to mark the current page in case I get distracted.

To make the notebook, I transferred the chart into an Excel spreadsheet and printed a copy for each row. This chart shows 6 rows so I made 6 copies, each with one of the six rows highlighted. I then trimmed the pages to half the original size and cut a transparent report cover to the same size. The pages and cover were then bound using a plastic binding spine that I got in Japan.

I checked around at the various office stores here in the US and found a similar binding system called Proclick. These types of bindings are very useful. The spines allow easy editing of the pages and unlike a binder, the pages flip 360 degrees. This biggest downside is the cost of the machine that punches the holes. Staples has it listed for $63. The Japanese version was a bit cheaper.

Another recent addition to my knitting bag is this small accessories bag from Eagle Creek. The front is made of a strong clear pliable plastic. I can now see all the tools before opening the pouch and easily pick out the one I need. My mini kacha-kacha row counter is conveniently attached to the side hook.

I’d love to get my hands on some of this clear plastic material to make a small organizer for the tools. Each item would have it’s own pocket. After doing some Google searching I think this plastic is called UVX and is mainly used for the windows of high altitude tents. Unfortunately I haven’t found a source that sells it.

Jet lag

Kacha_kachaJust got in from a trip to Kyoto and Tokyo so I’m in recovery mode today.

Instead of  hauling the current sweater project with me I took a new  project, the Scottish Wave scarf from A Treasury of Magical Knitting.

Despite two very long flights, I only managed to get eight rows done and now after checking the corrections on Cat Bordhi’s website, have to rip out half of those rows. Oh well, at least I got a lot of practice doing her “moebius cast-on”.

While in Tokyo I picked up this row counter at a craft store called Okadaya in Shinjuku (parallel to railroad tracks, left of Studio Alta – fifth floor). I’ll post more about Okadaya soon.

Patternworks has them listed as a Mini Kacha-Kacha on their website but haven’t gotten any in stock for a couple of months now. So, I feel a bit lucky to get a chance to pick up a couple while on my trip. Surprisingly, it wasn’t cheaper than the one Patternworks is offering.

What’s so special about this one? It can be hung around the neck on a string and  has a lock to keep the counter from accidentally being clicked when not in use.