Japanese Short-rows

j_shortrows

Several months ago, while reading Knitting in the Old Way, I came across Priscilla Gibson-Roberts’ description of how to work short-rows without wrapping the turning stitches.

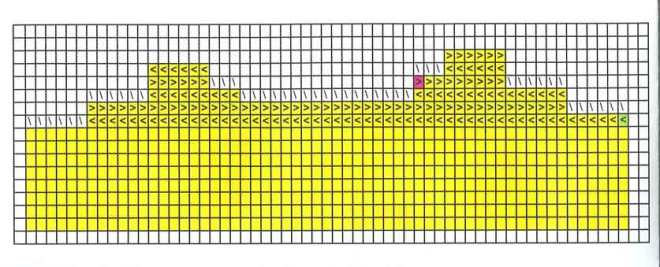
It starts out in the usual fashion; every other row is worked a certain number of stitches shorter then the last. The usual short-row method requires the knitter to wrap the stitch at the turning point, but with this technique the first stitch after the turn is slipped and not wrapped. After all the short-rows have been worked, one last row is worked across all stitches, stopping at each of the row changes to close the gap by lifting the thread between the slipped stitch and it’s adjoining stitch onto the left needle to create a new stitch that will be knitted together with the next stitch.

Now doesn’t that sound complicated? It did to me, so at that time I filed it away in my mental knitting “to learn” list and didn’t give it much thought until I ran across Susanna Hansson’s Japanese short-row class offered at Acorn Street. I jumped at the chance to learn this from a skilled instructor.

Despite only having three registered students, Susanna went ahead and taught the class last night. I’m so glad that it wasn’t cancelled. Susanna is a wonderful instructor. She clearly communicates not only how to do the technique but why we should follow each step. Upon finishing the swatch she encouraged us to stop and analyze our knitting to figure out why this brilliant technique works so well. I’d encourage anyone to take one of her classes.

If you would like to learn more about how to do Japanese short-rows and can’t take one of her classes, there are a few references on the subject.

Knitting in the Old Way by Pricilla A. Gibson-Roberts mentions how to work these short-rows on the knit side while working in the round.

basic_crochet_knitBasic Crochet & Knit by Ondori has very clear diagrams that cover each step (page 36). I purchased this one to supplement the class handout.

Reader’s Digest Knitter’s Handbook by Montse Stanley briefly mentions how to do this technique with a couple of pictures.

Short Rows & Shoulders

Marianne saw my pictures on how to do short-row wraps and asked for help on with short-rows on shoulders.

My first suggestion was to pick up The Knitter’s Book of Finishing Techniques by Nancie M. Wiseman. It has the best description of how to do short rows for a three-needle bind off. She does a much better job of explaining this than I can, but I’ll give it a shot.

When working short-row on shoulders you’ll need to do the opposite of what the directions tell you. Instead of binding off stitches at the beginning of a row, you’ll put the stitches at the end of the row on stitch holders. Here’s a chart that I made while working on the back of the Tea Tree sweater.

shoulder

Here’s a key to the chart.

\ = stitches on holders

< = knit side

> = purl side

green = start of shoulder shaping

pink = start with new piece of yarn

Now keep in mind that this chart also shows a neck edge that has short rows instead of being bound off. The next time I use this technique I might try binding off the neck stitches instead. I remember having trouble with holes when I tried to knit the collar band.

So here’s a step-by-step blow of what I remember doing. I usually try to knit while I write directions but right now I’m too busy spinning to get out my needles.

Begin shaping at green cell on the chart and work up.

Row 1: start on the knit side and knit to the last six stitches, wrap the stitch and turn

Row 2: purl to the last six stitches, wrap the stitch and turn

Row 3: knit 15 stitches, place 17 stitches on holder, knit to the last six stitches, wrap the stitch and turn

Row 4 (left hand side) : purl to last three stitches, wrap the stitch and turn (leave three collar stitches on holder)

Row 5 (left hand side): knit last six stitches and continue working down the shoulder to the armhole, remembering to hide the wraps.

Now go back to left hand side and start with new yarn.

Row 4 (right hand side): purl to last six stitches, wrap the stitch and turn

Row 5 (right hand side): knit to last three stitches, wrap the stitch and turn (leave three collar stitches on holder)

Row 6 (right hand side): purl last six stitches and continue working down the shoulder to the armhole, remembering to hide the wraps.

Ok, so there you go. I need to get back to the spinning wheel since I only have it for a week. Spinning is so much more difficult then knitting.

Snugging Stitches

After reading my posting about shaped cap sleeves Sarah asked, “what do you mean by snugging stitches?”

Since I find it hard to explain I decided to take a picture.

snug_short_rows.jpg

After I’m done knitting the sleeve cap and knit one row in the round, I stop and tighten up the first row of stitches that were picked up around the armhole. This is done using a knitting needle and gently pulling on the backside of each of the picked up stitchs to transfer the slack from one stitch to the next. In the picture, I drew black lines on the next few stitches that will be pulled. As I tug on a stitch the last stitch will get tighter and the current stitch will get bigger. The last stitch will end up being a big loop that I can tighten by pulling on the end of the yarn. Voila, all the stitches are tighter. Just be sure not to make them too tight.

Sarah also asked if a set-in sleeve and a cap sleeve are the same thing. That’s a good question. In my mind they are the same thing but I might be wrong. I know that “set-in” is the sewing term used to describe the sleeves on a typical men’s suit jacket or dress shirt. That’s the type of sleeve that I’m trying to, more or less, mimic in my current sweater project.

Shaped Cap Sleeves with Wrapped Short Rows

td_second_sleeve.jpg 
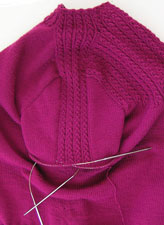
The second sleeve cap went much faster now that I understand how to work the short rows effectively. The wrapped stitches turned out much neater since the additional stitches helped minimize gaps. I still snugged up the picked up stitches once the cap was done.

As I mentioned in an earlier post, to create these sleeve caps I worked around the armhole in clockwise fashion picking up stitches starting at the top left side of the armhole (just after the shoulder strip), then placing the stitches from the underarm waste yarn onto the needle and finally picking up the stitches along the right edge of the armhole.

The “short” rows are started after working the patterned stitches on the shoulder strip plus knitting five stitches. At this point I wrapped the next stitch, turned to the purl side and worked across until five stitches after the strip and did another wrapped stitch. Rows are increased in this fashion until all but the underarm stitches are worked. I started working the sleeve in the round when the last stitches on the left and right were wrapped. I hid these last two wrapped stitches on the first row that was worked in the round.

It’s odd to call these wrapped “short” rows because in this instance the rows begin short and get longer as the picked up stitches are worked.

Why wrap the stitches? All the books I read said that wraps help keep the stitches tight otherwise gaps will form.

Want to see how to wrap stitches?

Continue reading