Lessons Learned

top down pullover The top down pullover is officially finished.

I’ve got to admit that while I will wear the sweater, I don’t think it will end up being one of my favorites. It has however provided an opportunity to learn from mistakes that will help improve future projects. Here’s what I’ve learned.

  • Debbie Bliss Cashmerino creates a very soft fabric that tends to get fuzzy and pills easily. It is more suitable for baby clothing that will only be used for one season but not for a sweater that should last for several years.
  • Don’t assume that the sweater will fit like the picture in the pattern. The woman who modeled this sweater in the magazine must be a size 2 while the sweater that she’s wearing a size 10. The actual fit is much tighter than shown. From now on I’ll check measurements more carefully before starting a project.
  • The biggest advantage of knitting from the top down is the ability to try on the garment as it progresses and make adjustments if necessary. However, this is only an advantage if washing and blocking doesn’t need to be taken into account. Cashmerino relaxes when washed so I was never sure whether it was going to fit properly.

Right Sleeve Bound Off

td_right_sleeve.jpg
The right sleeve is done and I cut the cord. Hopefully there is no turning back now. I’m ready for a new project but need to redo the left sleeve to call this one done. I’m giving myself one more week because I will be taking a wheel spinning class the last two Tuesdays this month and won’t have time to futz around with it then.

Open Twisted Rib

The stitch pattern on the top down pullover is called Open Twisted Rib which is a variation of one shown in The Harmony Guides 450 Knitting Stitches Volume 2, page 68.

open_twisted_rib2

I also found another version of this stitch pattern on KnittingFool.com. I can’t remember how I came across this web site but it looks quite useful.

Update: A few days ago, Nanette showed a pattern called Step Dance Socks that uses this stitch.

Shaped Cap Sleeves with Wrapped Short Rows

td_second_sleeve.jpg 
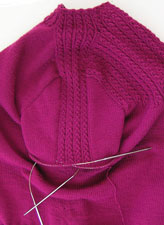
The second sleeve cap went much faster now that I understand how to work the short rows effectively. The wrapped stitches turned out much neater since the additional stitches helped minimize gaps. I still snugged up the picked up stitches once the cap was done.

As I mentioned in an earlier post, to create these sleeve caps I worked around the armhole in clockwise fashion picking up stitches starting at the top left side of the armhole (just after the shoulder strip), then placing the stitches from the underarm waste yarn onto the needle and finally picking up the stitches along the right edge of the armhole.

The “short” rows are started after working the patterned stitches on the shoulder strip plus knitting five stitches. At this point I wrapped the next stitch, turned to the purl side and worked across until five stitches after the strip and did another wrapped stitch. Rows are increased in this fashion until all but the underarm stitches are worked. I started working the sleeve in the round when the last stitches on the left and right were wrapped. I hid these last two wrapped stitches on the first row that was worked in the round.

It’s odd to call these wrapped “short” rows because in this instance the rows begin short and get longer as the picked up stitches are worked.

Why wrap the stitches? All the books I read said that wraps help keep the stitches tight otherwise gaps will form.

Want to see how to wrap stitches?

Continue reading

Here I go again

td_first_sleeve.jpg Here’s the lovely sleeve that I’ll be frogging sometime soon. Although I’m not thrilled with the idea ripping it out, I faced the fact that I won’t wear it if it doesn’t feel comfortable.

I had thoughts about forging ahead and hoping that the yarn will relax a bit once washed, at least that’s what the pattern says, but I just have a hunch that washing it won’t do the trick. Before I rip this sleeve out, I’m going to start on the other one but pick up stitches for one size larger. It’s only six more stitches so I think it should be ok.

Wrapped Short Row Woes

Actually, I should call them long rows because I’m increasing one stitch each row.

Despite being very careful, I’m still getting sloppy wrapped short rows and I’m blaming it on the yarn. It just seems to stretch too much, especially the picked up stitches. I’m getting around the problem by snugging up the picked up stitches one at a time and letting the slack out at the end where I started the pick up. That’s why the stitches on the top half of the cap look ok.

shortrowprob.jpg

While continuing my research on short rows I found that Priscilla Gibson-Roberts describes two methods for knitting shaped-cap sleeves in Knitting in the Old Way. One method is what I’m doing now, except she doesn’t do a wrapped stitch at the end of every row. The other method involves picking up stitches as you go along and not wrapping the slipped stitch. Perhaps I should have done the latter method in order to snugged up the stitches as I work. Oh well, too late now. I’m not starting over one more time.

t_photo_op.jpg

Notice the little paws in the bottom left of the photo? Well, somebody was just dying to get in a snuggle and snag the stitches. Look at his back paw.

Researching Wrapped Short Rows

I was getting so tired of the never-ending bottom rib of the top-down pullover that I was really tempted to leave it for later and start the sleeves. They seemed so much more intriguing.

Despite the temptation to jump ahead, I finished the ribbing but left the bind off for later. I’m still not sure about the length so I’ll leave that decision for later.

For the past two days I started and ripped out the sleeve three times. So while the sleeve is definitely intriguing it has been a bit more challenging then anticipated.

These set-in sleeves use wrapped short rows to shape the sleeve cap. To start off, a row of stitches are picked up around the whole armhole from the bottom front. Next, markers are place at the top of the cap to mark off where the short rows will be worked (one on the left top and another on the right top). The short rows are then worked between the markers, back and forth from the top of the cap to the bottom

of the armhole. Once at the armhole the sleeve continues to be knit in the round until the cuff.

This all seems easy enough, except that the wrapped short rows on the front are looking pretty sloppy and large. There are a combination of demons that are causing me grief. At this point the sweater is starting to get heavy to move around, the stitches seem to get stretched out by the long tips of the circular needles, and the yarn has a tendency to stretch if worked too many times.

So for the past few days I’ve been researching wrapped short rows and search my grandmother’s needle collection for a circular with smaller tips. I’ll make another attempt tomorrow.

I think the best reference for short rows is in “Knitter’s Book of Finishing Techniques” by Nancie Wiseman. I found the following online references, which are ok but not quite so detailed.

DnT, Inc.

Sweaterscapes

By the way, I’m glad to see that Krista Jo of KnitWit is blogging again.

Try On

tryon.jpg I’ve been diligently working on the bottom rib but keep making the same decrease mistake, argh! Definitely time to put the needles down and do something else.

Here’s a quick snap shot of me trying it on. It seems a little tight at the hips even though I did do four extra increases just before starting the rib. I’m hoping that the tension will relax a bit (as noted in the pattern) once I wash it.

girl_knitting.jpg Knitting the torso of the top-down pullover seems to take so long now that I’m working the bottom rib. I just spent 15 minutes ripping out a row because I forgot to do a decrease. This is definitely one of the biggest disadvantages of knitting in the round.

This picture is from the Library of Congress, Prints and Photographs Division [reproduction number LC-USZ62-126794]. I came across this web site after doing a google image search on knitting.

Round or Flat ?

I’ve picked up the top down pullover project this week. I placed it on hold while I considered whether the bottom part of the body was going to be wide enough. circular.jpg I finally came up with a silly idea on how to test the width. Since this sweater has a slight hourglass body (width is same at the under arm and lower torso), I tried on the sweater upside down. I did feel quite silly doing this but, … oh well.

When I first started this sweater I suspected that I might prefer to knit sweaters in the round. At this point, I find that each method has advantages and disadvantages, the decision of which to use depends on the pattern.

Flat Round
can hide yarn ends in seams yarn ends might be more obvious
easier for intarsia easier for Fair Isle
easily match stripes around body stripes and patterns can jog
less area to rip out when errors more area to rip out when errors
seams might add bulk no or few bulky seams
must take care that rows match between pieces might involve steeks or some flat knitting
many seams to sew few seams to sews
harder to fit during construction can try on during construction
more armhole shaping possibilities limited armhole shaping possibilities