Deciphering Instructions

td_pickup_front.jpg After the collar was finished I started the shoulder panels. I wasn’t paying enough attention to where I started these panels and realized half way through that my stitch pattern was off. I ripped out them out and started over. Now I’m back on track and will start working the front.

I’ve been somewhat puzzled over the directions at this point. The lace stitch is now worked flat and the pattern says, “Patt st is mirrored with 3 end sts when working back and forth (flat)”. The stitch guide on the pattern also says, “multiples of 5 + 3”. I’ve surmised that I should work 3 knit stitches on each side of the front. The rest will be in pattern. I confirmed with The Principles of Knitting that directions for lace patterns will frequently list the number of stitches by saying, “multiples of X + X “. The number after the plus sign refers to selvedge or edge stitches.

Design Inspiration

While Christmas shopping this morning I came across a wonderful store called Pavo Real that sells beautiful sweaters. new_sweater This particular sweater caught my eye. Although it is shaped like a traditional Scandinavian cardigan, the design has a more oriental arabesque favor which is accented with a tassel zipper pull. The maker is Icelandic Designs.

The Handy Magic Loop

mloop_start.jpg 
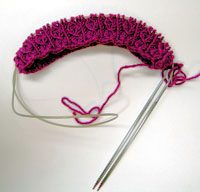
The top down pullover is finally on the needles with a couple repeats of the mock cable stitch pattern. The pattern says to use a 16″ circular needle to start the collar but I don’t have one. I’m making due with my 40″ circular needle by using the magic loop.

How to Knit with One Circular Needle

Be sure to use a needle with a very flexible cable. I use Addi Turbo needles, which for the most part have worked wonderfully, but I have noticed that the manufacturer changed the cable material. The newest ones are not as flexible as my older ones. I won’t purchase new ones until the cables improve.

After casting on, the needle cable is folded in half to form a loop. Grab the tip of the loop and pull it out to the left side leaving the stitches on the cable. The tips of the needles will poke out of the right side. Starting the magic loop is always a little awkward, especially the first time, but becomes much easier after a few rounds have been knit.

The photo on the left shows the start of a round. Notice that the tips of the needle are on the right side and the needle cable forms a loop on the left side. Half of the stitches are on the front part of the cable and the other half are on the back part of the cable.

To position the needle tips for knitting, slide the front stitches onto the front needle tip and leave the back stitches resting on the cable. Pull the back needle tip forward a bit and position it so that the stitches on the front needle (now the left needle) can be knit onto the back needle (now the right needle) as if knitting on straight needles.

mloop_mid.jpg 
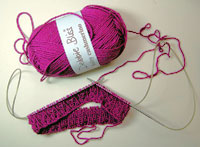
Knit all the stitches from the left needle tip onto the right needle tip. Once the first side is done flip the work to the other side so that the needle tips are again on the right side and the loop is on the left. The second half of the round can be worked just like the first half.

I learned the Magic Loop from Sarah Hauschka who helped create a booklet about this technique.

New Book

I didn’t get much time to knit during the Thanksgiving holiday but did manage a trip to The Weaving Works to pick up the winter issue of Spin-Off magazine. While there, I was pleasantly surprised to find a copy of the new edition of Knitting in the Old Way by Priscilla Gibson-Roberts and Deborah Robson. I wasn’t expecting to see a copy of this book for a couple of months. Amazon shows a February 2004 release date.

This afternoon I flipped through the book and briefly skimmed through each section. On first glance, it looks like a good reference for knitting a variety of traditional sweaters. The first half is filled with the obligatory chapters on yarn, equipment, methods and techniques and then launches into a discussion of various sweater shapes based on the percentage system. The last half of the book classifies traditional sweaters by technique; color stranding, intarsia, texture geometric patterning and crochet-enhanced knits, with each technique demonstrated via traditional sweaters from several countries.

I have one initial criticism about this book. Where are the photographs? All the sweaters and techniques are illustrated with line drawings by the author. While line drawings are fine for showing techniques, the sweaters would be more inspiring if shown on models in photographs.

Debbie Bliss Cashmerino

bliss_swatch.jpg Marie asked for my opinion of the Debbie Bliss Cashmerino yarn that I’ll be using for my next project.

I hesitated before buying this yarn and briefly looked for a substitute. First off, this yarn contains 33% microfibre. If I’m going to hand knit a sweater, I usually try to avoid yarns that are not 100% wool. Perhaps it is an unreasonable bias but I just prefer to wear and knit natural fibers. Another reason I hesitated was because of its strange twist. I think this twist causes the “V” shape of knit stitches to be out of whack and I’m not sure if I like this effect. Despite these reservations I decide to go ahead and give it a try.

So far I like it, but won’t have a truly informed opinion until the sweater is finished. The swatch is very, very soft which is due to the merino (55%) and cashmere (12%). No wonder Debbie Bliss calls it baby cashmerino. I think it would be perfect for baby clothes.

The pattern for the pullover mentions that this yarn tends to relax so it is really important to knit a swatch and wash it just as you will wash the sweater. I followed this advice and found that my swatch did indeed grow a bit. I would venture to guess that the microfibre causes the yarn to relax.

Next challenge

debbiebliss.jpg A couple months ago, the construction of the Blue Waterfall Pullover in the summer issue of INKnitters magazine peaked my interest. It is started in the round at the neck, switches to flat knitting for the upper torso and then changes back to circular knitting for the bottom torso. The shoulders are also worked from the top, beginning with stitches picked up from the short-row shaped shoulders. This looks like a great technique to minimize seams while maintaining a tailored shape.

Le cardigan rayé est fini.

phildonefull.jpg Thanks to Alison for sponsoring the Phildar Fillies knit-along. I’ve enjoyed watching the progress of other Phildar projects.

I did end up cutting 3/4″ off of each center front and finished the edge with a zigzag machine stitch. I found that my regular machine foot does have a tendency to stretch the fabric. It probably would have been a good idea to use a walking foot to minimize the stretching, but I did ok without one.

Collar

Attaching the collar was a simple process. I just followed the detailed directions in the pattern book. I pinned the collar to the outside of the sweater positioning it so that more stitches were on the front. Then I pulled out all but one row of the red stitches. The last row of red stitches was unraveled stitch by stitch as I sewed each collar stitch to the sweater with a backstitch.

Satin Hook and Eye Tape

The pattern didn’t have much detail on how to attach the hook and eye tape so I decided to handle it in the same way I hand sew a quilt binding. The goal is to fold the tape around the edge of the sweater fabric and tack it down with an invisible stitch. The top and bottom edges of the tape are hidden by folding them to the inside of the tape. I recommend using a needle with a small eye.

I started by basting (or pinning) the back half of the tape to the sweater and then carefully stitching down the tape. Once the back of the tape was secured I folded it to the front and stitched this edge of the tape to the front of the sweater. I used an invisible stitch that I taught myself and find difficult to explain but I’ll try.

I start the stitch by inserting the needle into the fold of the tape, trying not to catch either side of the tape (just a piece of the fold). After the needle catches a small amount of fabric from the fold I push the tip of the needle out. To finish the stitch, I catch a bit of fabric from the sweater, then tug the needle free and tighten the thread so the stitch doesn’t show.

Swatch Experiment

cotton_swatch2.jpg

I spent all day Friday weaving many ends of yarn into the seam allowances of my latest sweater. Now that I’ve had a chance to try it on without tons of ends hanging out, I’ve decided that I need to cut an inch off of each center front half of the sweater.

Before subjecting my newly knitted sweater to scissors, I figured I’d better try cutting up a swatch first. After dusting the sewing machine, adjusting it to produce a small zigzag stitch and sewing two lines of stitches down the center, I carefully cut between the two lines. I tested how well the stitches would hold together by tugging on the stitches. The stitches held quite well, although I did produce a bit of fringe. I wouldn’t use this technique on seam allowances but will be using it on the front of my cardigan. Fringe won’t be a problem since the edges will be covered with a very pink satin ribbon strip.

Tonight I made a special trip to the fabric store to pick up matching pink thread. While I have many spools of thread not one of them is hot pink.

Latvian Thumbhole & Half Hitch Cast On

mitten_thumbhole.jpgI’ve been diligently working on the left mitten and arrived at the point where the thumbhole should be. The round starts on the left side of the palm so the thumbhole is created while working on the last half of the stitches on the first needle (I’m using two circulars instead of double point needles).

thumb_cast_on.jpgOn the first needle I knitted the first 25 stitches according to the chart (25% of the stitches on this needle minus plus 1). I then started the top of the hole by using a loop cast on to add 22 new stitches while still following the chart. Lizbeth Upitis calls this cast on a half hitch but I found a good illustration from Wonderful Things , which refers to it as a single cast on . After casting on the new stitches, I put the bottom 22 stitches on hold using a strand of cotton yarn. The remaining stitch is knit onto the left needle. Now I can continue knitting the mitten and save the thumb for later.

Knitting Stripes

Now that I’m almost done with the sweater I just realized that I handled the stripes the wrong way. Last night I was flipping through The Principles of Knitting and noticed that the section on color techniques (page 252) talks about how to knit stripes*. The author mentions that yarn not being used for the current stripe can be carried vertically along the selvedge edge. I remember thinking about this at one point and checked some of the other reference books but didn’t find one that mentioned how to knit stripes. At this point I’m not sure what to do. I can weave in the ends but I’m also thinking about trying to bind the selvedge edges with machine stitching, almost as if I was working on a steek. I wonder if steeks are done on cotton sweaters.

* Knitting Stripes on Flat Stockinette Fabric
Carrying yarn up along the selvedge is easy when the stripes have an even number of rows but what about stripes that an uneven number of rows? Suppose I’m knitting fabric that has one row per color, won’t the working yarn end up on the opposite end of the work?

Just use the Slide technique as described in June Hemmons Hiatt’s book. Suppose, I knit the first row in one color (red) and then purl the next row with another color (white). Turn the work so the the right (knit) side is facing. At this point the red yarn is on the left side of the fabric and the white yarn on the right side. I now want to work a red row but the red yarn end is on the “wrong edge” so I can’t pick up and knit it as usual. What do I do now ? Well, since I’m using a circular needle I’ll just slide the stitches onto the left needle tip, turn the work to the wrong (purl) side and work a row of purl stitches with the red yarn. Now both the red and white yarn ends will be on the same side. The next time the working yarn is on the “wrong edge”, I can just slide the stitches along the circular needle toward the needle tip that has the desired working yarn and either purl or knit depending on which side of the fabric is facing.