Thoughts on the final project

vneck_cardigan_front
It’s been a knitting marathon this weekend. The front two pieces of the v-neck cardigan are drying while I work on the vertical button band.

Sleeves are on the back burner until I finish the crochet swatch and draw patterns for the next two projects.

Nope, I haven’t picked up the crochet project yet but will soon. Nothing fancy with that one. Just a simple child size vest in double crochet.
Jennifer's cardigan

Here’s what I’ve been thinking about for my final project.

Inspired by my co-worker’s sweater I’d like to make a notched collar jacket. My “napkin sketch” is below.


Final project napkin sketch

Since I won’t have much time to knit this project the body will most likely be in stockinette with 2×2 ribbing for the collar and lower edge. I recently bought Jo Sharp Silk Road DK that I’d like to use but I’m not sure if it might be too rustic for this design.

It will be interesting to see what Jean thinks about this idea.

Blue skies

Roundneckcardigan Finally a full day of sunshine and blue skies.

This one was a joy to knit mostly because I encountered very few problems.  But, there are two things that bother me about the finished garment. First, my row gauge was off so it’s about 1.5cm too long (including the sleeves) and second, it seems to look totally different on me when I look at it in my bathroom mirror. This photo makes it look bulky on me.

KarenJo asked if I would demonstrate the buttonhole next time SKG has mini classes. Sure, I’ll do that if I’m available then.

Now it’s on to the v-neck cardigan. The back is finished and the right front is nearly half done. The button band on this one will be knit vertically and then sewn on.

Only two more weeks until our next class. As always, there’s so much to do and so little time.

Oh, those feet in the photo last week belong to Mittens, the one who can’t resist sitting on my knitting.

v neck cardigan back

One step back

Vneck_cardi_colorCan’t believe I fell for this mistake again.

I was nearly finished with the back of the v-neck cardigan and noticed a slight color difference between a fresh ball of yarn and the last one. I immediately scanned the piece under better lighting and sure enough, there was a noticeable change in shade farther down the knitted piece.  To confirm my suspicions I pulled out the ball bands from the already used yarn. Arraugh!!!, I had just used a rogue ball of yarn from a different dye lot!

On a happier note, Jean was in town this weekend so I stopped by to get help with the last for stitches of the round neck cardigan button bands. That’s done. Now I just have to sew on 10 buttons.

Sans buttons

round neck cardi sans button

This one should have been finished this weekend but I hit a snag.

I’m stuck on the last four stitches of each button band.  After a few hours of trying all sorts of ways to finish those darn stitches I gave up. It will have to wait until Jean can show me the proper way.

Normally finishing an invisible cast off isn’t difficult but the ribbing on this cardigan is a tad different than normal. Instead of starting and ending with two (or three) knit stitches mine starts and ends with four.  Jean suggested doing this when I mentioned that my first and last buttons seemed too close to the top and bottom edge.

I’ll go ahead and sew on the buttons this week after I have a chance to steam the bands into shape. It looks a little curled. I shouldn’t have gone down 1mm in needle size and decrease 10% of the picked up stitches.

About working the button band …

stitches were picked up along the front edges and knit back and forth. Here’s one more hint about how it was done – the short rows are done between the holes.

v neck cardi back
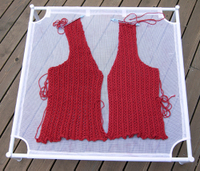
So for now I’m on to a new project, the v-neck cardigan. Here’s what I got done today on the long car trip home from Winthrop.

It’s Rowan Wool Cotton on 3.75mm needles. The stitch pattern and idea is from an old Kim Hargreaves’ pattern called Alice (in The Ultimate Knitter’s Guide by Kate Buller).

Buttonholes

Round neck cardigan buttonhole

This weekend was all about buttons, button bands and buttonholes.

Jean demonstrated one of the same technique taught in her button hole class at Madrona. Lucky for me. I was too tired to fully comprehend it during the Madrona class.

She comes up with the most interesting techniques. I won’t give it away but will mention I’ve never seen it in any reference book and it uses short rows.

Here’s a closer look.

Sorry for the short post but … I’m tired after another 10 hours of classes.

Halfway point

v-neck pullover done

The most difficult garment to date is finally finished.

Remaining projects:

– Round neck cardigan
75% finished, only 1.5 sleeves to finish + button band

Would have been much further if I hadn’t miscalculated the sleeve increase and noticed the problem after knitting half of one sleeve.

– V-neck cardigan
Knitting not started (even though half should be done).

– Crochet vest
Have no idea what I’ll do with this one. I know that some folks are very sensitive when knitters offer negative comments about crochet … but honestly, I’ve yet to see a crochet garment that I’d like to make or wear.

– Own design
Mulling over several ideas

Finishing details

A weekend of blocking, sewing and very little knitting.

 vneck pullover

I just keep plugging away.

round neck cardigan

Coming up …

– Finish sewing v-neck pullover
– Pick up and knit neck ribbing for the round neck cardigan
– Finish round neck cardigan sleeves
– Acquire buttons for round neck cardigan
– Finish v-neck cardigan drawing
– Button band swatch for v-neck cardigan
– Knit arms, back and front of v-neck cardigan to bust
– Design notes for round neck pullover &  v-neck pullover

Time?
Two weeks and counting.
It will be a miracle if I can get this list of tasks done before the next set of class .

Grafting results

It was a full week before I gather enough courage to press on with the daunting deed.

The first attempt seemed quite easy until I pulled out the waste yarn and found that all of the purl stitches were sew as if they were knit stitches. Of course I ripped it all out and tried again. I had much better results on the second try only missing one stitch that I was able to fix with a imperceivable patch job.

Here are a few photos.

As I mentioned before, the sleeve was started with a provisional cast-on using a separate waste yarn. That wast yarn was removed and the remaining live stitches were transfered to a thin nylon thread.With the top part of the ribbing piece tucked under the bottom part of the sleeve, both pieces were grafted together with a darning needle.A row of thin white nylon cord served as a guide.

Grafting closeup 1
Sewing alternated between stitches on the ribbing and the live ones from the sleeve.This photo shows the needle as it entered a stitch in the ribbing. It was then pulled through the next ribbing stitch on the left.


Grafting closeup 2
After completing the two rib stitches I switched to the sleeve stitches.These two stitches form a knit stitch.I quickly got into a rhythm of sewing two stitches from the sleeve and then two stitches from the ribbing.When all stitches were completed I removed the waste yarns.


v neck sleeve ribbing
Here are the results.

Not bad, if I do say so myself.

Grafting pattern stitches

v-neck pullover ribThe v-neck pullover should have been finished long ago but I’ve been stuck trying to figure out what to do with the ribbing around the body and wrists.

Like the previous three sweaters, this one was started with a provisional cast-on with the assumption that I would later work the ribbing in the opposite direction and finished it with an invisible bind off. But unfortunately I wasn’t fully aware that when stitches are worked in the opposite direction they end up being  1/2 stitch off of the ones going in the other direction. If I forge ahead and working the ribbing as “planned” some of my knit and purl stitches will not line up with the ones on the rib. If I want the stitches to properly line up I’ll have to graft the ribbing to the body. What a daunting task!

Jean suggested making swatches out of a lighter yarn and practicing before attempting the feat.

So without much of an idea of what to do I made my swatches and fiddled around with them for a few days. Luckily Michale saw me struggling to come up with a solution and came to my rescue with her copy of Lucy Neatby’s DVD. Lucy has an interesting technique that makes grafting look easy. Basically she knits beyond the edge of the pieces with waste yarn and then holding the to-be-grafted rows together uses the stitches on the waste yarn as a guide to graft a new row of stitches. I’m going to adopt this technique but adjusted it a bit to suite my circumstance.

To start, I worked the 1×1 rib as usual minus one row. The last row was then worked in a light colored slippery yarn (white). The next two rows were worked in a third color (green) with the same pattern as the body before switching to stockinette stitch.

Now I’m all set to start grafting. The row of white stitches will serve as my guide. I’ll thread my darning needle with a piece of  purple yarn (used for the body and cuff) and then start stitching close to the white  thread, creating a new row of stitches as I go.  I’ll mimic the stitches as they enter and exit the green waste yarn and then ribbing.  Where ever the white yarn enter/exits a stitch in the green waste yarn, I’ll do the same with the stitches on the sleeve and likewise with the ribbing side. After all stitches have been grafted I’ll remove the white and green yarn.

Wish me luck. I’ll be sure to give an update on how it turns out.

Round neck cardigan front

Darn cat, I can’t seem to keep her off of the round neck cardigan while it dries.

Mind the tails

SophieFor the past couple of days I’ve been sitting at the dinning room table diligently sewing the arms onto the round neck pullover. Occasionally one or the other  feline would jumped in the middle of the operation to “ask” if I needed any help. As I worked on securing all the loose yarn ends, a small pile of yarn bits developed. After the operation was finished all bits were promptly thrown into the garbage bin.

Well, this morning I awoke to see one of the silliest things … a 20cm piece of Panda Cotton hanging out of Sophie’s rear end. Paul couldn’t help but laugh until I explained how serious this problem could be. I’ve heard this type of incident can be a life threatening ordeal. I was a bit horrified. I’ve always tried to be very diligent about not leaving yarn lying around, especially bits and pieces.

After a bit of Internet research we decide to call the animal hospital to see what they’d recommend. After all she was still being her precocious self with no signs of vomiting or discomfort. Of course, the animal hospital recommend we bring her in.

Round neck pullover So what can a vet do in this situation? I think she as puzzled about this predicament as we were. Since Sophie seemed normal the only thing that could be done was to take x-rays to check the intestines for any abnormalities. After 15 minutes of waiting the x-rays were finished and everything looked OK. At that point we could really only monitor the situation, give her a dose of laxative and take her back at the first sign of any problems.

Fortunately, several hours after our hospital visit Sophie pooped. A quick check of the rear showed no evidence of yarn.  We sifted through her stool and saw what looked like the rest of the yarn.

So, here’s a word of advice for knitters with feline companions. Be ever so diligent about yarn tails, because you never know where they’ll end up.

On another note, I’m so happy finally have this one finished. Besides th incident with Sophie, it was a minor ordeal getting the pieces together with this loosely plied yarn.