Cleaning Wool

When I knit in public, I never know what will come from it.

Last summer while on a short hiking trip in the Methow with folks from PBI, I whipped out a mitten project during our lunch break. As I worked a few rows, my fellow hikers mentioned that knitting and spinning was a popular activity when they moved there among a wave of hippies. One hiker mentioned that she happened to have a fleece given to her by a friend who had raised sheep and spun wool. It had been used as part of a Halloween costume but was no longer needed. Since I was so enthusiastic about knitting, she graciously offered me the fleece. I gladly accepted not fully understanding the ramifications.

After the fleece sat in the box for a couple of weeks while I research what to do with it, I finally got enough courage to dive in and clean it. I’ve read that a fleece can be soaked in a top loading washing machine as long as there is no agitation. After the fleece is clean through soaking, the water can be spun out of the wool by putting the washer in spin mode. Although this sounded like a fast way to get the job done, this method wasn’t an option for me since I converted to a front loader a couple of years ago.

wool_cleaning Here are the steps that I took to manually clean the fleece. It’s a long process but keeps the lock intact which is important when spinning worsted yarn.

1. Separate a bunch of the wool locks from the fleece and put them in a mesh laundry bag, keeping the cut ends together so as not to mix up the ends of the wool.

2. Fill the buckets with very hot tap water and then add lots of Dawn dishwashing soap.

3. Place the mesh bag of wool into one bucket and let it soak for 10 minutes. Be sure not to agitate the wool or it might felt.

4. Repeat soaking with another bucket of new water until the water starts to look clean. Each bucket of water must be at the same temperature as the last, otherwise the wool might start to felt.

5. When the wool is fairly clean, rinse it in fresh hot water.

6. Gently take the wool out of mesh bags and put on a drying rack. It takes about one to two days to dry.

The mesh laundry bags help keep the locks together and allow the wool to be delicately removed from the water. Keep in mind that wool will felt if there is too much agitation or a drastic change in the water temperature.

Don’t be surprised if the wool changes color when cleaned. This one turned from brown to gray with white highlights.

wool

Blocking?

gl_left_front Here’s what I accomplished over the weekend while on a car trip to the other side of the mountains. Hopefully it will get more interesting when I start the sleeves. The main body pieces are simple rectangles, minus a small triangle on the upper edges. The sleeves are a little more complicated since they extend over the shoulders to form the collar and upper back.

The curled edges in the photo got me thinking about blocking. To be honest, I’m not serious about blocking. I usually just lightly steam any curled edges and move straight to sewing. However, this time I’m going to try using a set of blocking wires that I learned about a couple of months ago while reading Marilyn’s blog.

Yarn Construction

gilet lace

Bergereine is unlike any yarn that I’ve used.

Of course, being a new spinner, I took apart a piece to see how it was made. It’s constructed with 4-ply strands of 3-ply yarn. Each 3-ply yarn is made of two strands of cotton thread and one strand of wool.

It knits nicely but is not so easy to rip out since the small strands of cotton tend to get easily snagged by the needle. The fabric has the feel of soft cotton and the stretch of wool, so it should make a comfortable summer sweater.

I’ll be casting on a piece this week – probably a sleeve. Yep, I’m knitting this one in pieces instead of adjusting it to knit in the round. It will be so much easier to take along with me if I knit in pieces.

Twists Per Inch (TPI)

Friday, I plyed some singles on my wheel for the first time and ended up with a twisted mess that couldn’t be straightened through washing. It was all very sad. Plying on a spindle never produced such horrible results, so I was a little depressed about the whole ordeal.

spinning_ref

While at the sale on Saturday, I finally caved in and bought Spinning Wool Beyond the Basics by Anne Field. Although I’ve only flipped through the book, I’ve learned how to regulate twists per inch (tpi) by counting treadle cycles. Only an inch of fiber is feed into the orifice for every revolution of the wheel. Monitoring twist in this way should result in a single with consistent twist through out the thread.

The book mentions keeping track of the wheel revolution by counting on the down pedal but I’ve come up with my own technique. I put a bright sticky note on the top edge of the wheel and watch for it as I spin. Every time I see the sticky note at the top, I feed in an inch of fiber.

The singles are look pretty good but the real test will happen when I attempt to ply. Before my next attempt, I’ll follow the handy 2-ply twist comparison chart in Beyond the Basics to determine the correct plied twist per inch. This chart lists desired tpi for singles along with corresponding tpi for plied yarn. Singles are generally plied with 2/3 of the amount of twist used to spin the singles.

This weekend I also received my Paradise Fiber order which contained a copy of Handspinning Advanced Techniques. It promises to teach me how to “make a plied yarn of any exact thickness with just the amount of twist …” Sounds promising. I started watching it but dozed off after the hand carding segment.

No Bells

The fool doth think he is wise, but the wise man knows himself to be a fool.
– Shakespeare

jester_finished

Yep, I didn’t add the bells but I’m considering adding medium size pompoms.

The model was made from a kit that I put together in a Junior High Home Economics class. I can’t believe he’s hung around all these years.

WPI

While working on my current knitting project I’ve been squeezing in time to practice spinning merino. Eventually I’ll get good enough at it and find enough courage to start spinning the fiber from the Spin-Off sweater kit.

wpi

This week I’ve been concentrating on “wraps per inch” (wpi). In order to get consistent yarn in the spinning world, spinners measure the average width of their yarn by wrapping it around a ruler many times and then counting how many wraps there are per inch. This merino practice yarn is yielding between 13 and 14 wpi. Now I just need to figure out if this will translate into the correct knitted gauge for the project.

Yesterday I received the new summer issue of Interweave Knits and finally took a closer look at the “sources for supplies” section in the back. Not only do they show each yarn used in the projects but they also list the ply and wip of each one. It occurred to me that perhaps I could use this information to compare my handspun yarn to a store bought yarn that is close to the weight I need. Last night I pulled out my old issues and came up with a list of comparison yarns. A couple of the yarns are already in my “stash” so I should be able to find one that will work as a good comparison yarn.

If you’re not a spinner, you might still find wpi interesting since it seems like a good way to compare yarns when trying to find a substitute.

Knitting Stripes in the Round

jester_brim 
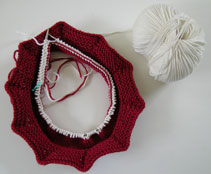
The pattern says to start out with a 16″ circular needle. Of course I didn’t have a 16″ needle so I attempted to use a 40″ and reduce the circumference using the magic loop method. With 160 stitches to manage, I twisted the stitches to form a moebius. Now I sympathize with Rob who recently mentioned unwittingly doing this while knitting the hem of a tunic. As you can see from the photo, I switched to a 16″ needle.

After the brim, stripes are next. Since knitting in the round creates a spiral, stripes will jog where one stripe ends and the next one starts. The book mentions hiding the jog when sewing the ends of each stripe. Well I don’t intend to leave any ends between stripes; I’d rather avoid sewing so I’ll carry the unused color up the “side” by twisting the yarns together at the beginning of each round. So to avoid the jog I’m going to use the Danish method described in Simple Socks by Priscilla Gibson-Roberts.

On this hat I’m knitting white and blue stripes that are three rows in height. When I transition from a white stripe to a blue one, I knit the first stitch of the first blue row with both colors and continue knitting the first row of the blue stripe until I come across the blue/white stitch that started the round. I knit these stitches together with the blue running yarn and then pull on the end of the white yarn until the jog gets hidden. I’ll repeat these stepswith the next stripe, reversing the colors and hopefully end up with jogless stripes.

Jester

Here’s my other project, a Jester hat from Knit Baby Head & Toes. A dear friend is having her first baby so it’s time to whip out some baby items even though I’m about to start a sweater project.

jester_hat_swatch I chose Rowan Wool Cotton, which is so soft, and such a pleasure to knit. The first swatch was done on size 6 needles at 5.5 stitches per inch as specified in the pattern. However, I think this yarn might look better at 6 stitches per inch. Tonight I’ll do another swatch with a size five needle. If that gives me 6 stitches to an inch I’ll just knit the larger sized hat. Heck, I just found out that I didn’t quite follow the directions on the Shining Star hat. It should acutally have five points instead of six. I saw “six needles” and translated that into six points.

So, I think there’s only one thing wrong with this Jester hat. Should I really attach small bells? Seems like a choking hazard to me. After spending last weekend with a couple of babies I learned, “if it doesn’t fit in a toilet paper tube then it shouldn’t be given to small kids”. We were all laughing about how we survive childhood despite having tons of small Fisher Price Play People.

Another Seattle Store?

I’ve counted six yarn stores within the Seattle city limits and just spotted another one that will be opening downtown. Apparently the Belltown shop on First Avenue that recently housed the Italian pottery shop RiFlessi will be the new home of So Much Yarn. Wow, I’ll actually be able to buy yarn and supplies during my lunch break. Oh, it’s just too much.

Look what I picked up at the post office. Despite six yarn stores in the city I still order some yarn via mail.

gilet_lace_yarn Yep, it’s Bergereine yarn and the 2003/2004 instruction booklet from Club Direct Laine (the only place to get Bergere de France yarn in North America). This yarn is destin for Gilet Lace. I guess this will be the next sweater project since I haven’t yet found a men’s sweater to make for my husband. Oh yea, I also can’t forget to finish the Christmas stocking that I started last December. That will come out of hiding soon.