Kauni Cardigan

Kauni Cardigan

Thanks Ruth. It’s a fabulous pattern.

I finally got the buttonholes done!  Here a close up of the best one
. I did use the corrugated buttonhole from Sweaters from Camp but instead of using a cable cast on for the second part of the one row buttonhole, I used a chained cast on. The tough part about this buttonhole is keeping top and bottom sides neat. I kind of fudged that part. Notice that the buttonhole is all one color? It’s not your ordinary one row buttonhole.

I still think buttonholes are a pain.

finished button bandsI’m more pleased with the top and bottoms of the front bands. I used a crochet hook to chain stitch over the last stitch. They line up pretty well with the neck and bottom band but next time I might just try the technique that Margaret D. mentioned in the comments for my last post. Thanks Margaret.

Vanessa asked if the front and back of my raglan are the same. It’s all stockinette stitch. I would loved to have added cables on the front and/or sides but I only brought a swatch in stockinette stitch to class. That’s OK though, there’s so much to do in class that it’s probably a good to start simple.

Buttonholes are a pain

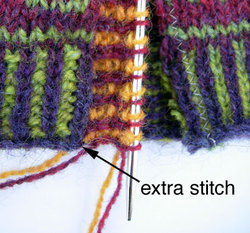
extra stitch

I ripped out what little of the button band that was started last week. I wanted a fresh start and a chance to try a new technique that I found while flipping through one of my Japanese knitting textbook s(page 49 – Beginner’s book).

Instead of picking up the first stitch from a row, it shows how to cast on an extra stitch by looping the yarn around the needle and then continuing to pick up stitches along the edge as normal. Before ending the row another extra loop stitch is cast on as the last stitch.

After applying this technique my button band has 121 stitches instead of 119 as previously mentioned.

My class notes from the Winter Retreat mention that adding an extra stitch at the start and end of a button band will help keep the ends of the band from pulling in. My first attempt doesn’t look so great but once I sew in the ends I think it will look better. I’m also considering crocheting a chain stitch to the bottom of the last row so it looks more like the rest of the bottom edge.

Besides reworking the partial button band, I did make several false attempts at starting the buttonhole row. None looked right. After taking a break I think I’ve hit upon a workable solution after reading (and re-reading) Medrith Glover’s Buttonhole for corrugated ribbing in Sweaters from Camp. It’s based on that buttonhole but tweeked a bit. Once it’s perfected I’ll let you see it.

Homework

topdown

Here’s one of two homework projects for my next class – a top-down raglan pullover.

It’s so simple.

The number of cast-on stitches are based on the circumference of the head minus 10% – 20%. Knit increases every other row until the front and back equal the circumference of the torso. Next we’ll put the sleeve stitches on hold and join the front and back before knitting to the waist.

Notice the red thread at the top? A provisional cast-on was used. Later we’ll add ribbing from those provisional stitches.

Non-stop knitting

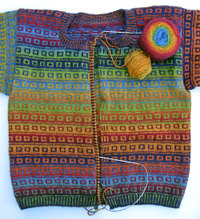
Buttonhole_band I really wanted to wrap up work on this cardigan before the Nihon Vogue program started last weekend but kept running into trouble with the buttonholes.  My last and only encounter with buttonholes was much different. This 1×1 corrugated rib is much harder to work than garter stitch. My initial plan was to make the buttonholes that are three stitches long but that turned out too tight. Next I’ll try four stitches.

Nihon Vogue

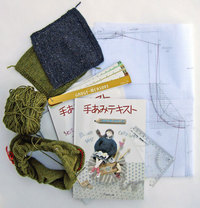
After this weekend I’ve been converted from a one-project-at-a-time knitter  to a multiple project knitter. The MFA Nihon Vogue Certificate Program with Jean Wong started last weekend and within two days I had two new projects started. We started a top down raglan pullover (green) and drew a plan for a pullover vest (grey). The key to surviving the weekend (at least for me) was to stick with good old stockinette stitch thus avoiding headaches caused by needing to match repeats.

From here on out it will be a game of catch up. I need to finish the Kauni cardigan, the Angel Lace shawl and manage to get my homework done before next months class.

Buttons procured

buttons
Finding the right buttons has got to be one of the biggest challenges when knitting a cardigan. Here’s what I came up with after two trips to fabric stores and one to a yarn store.

Most of the buttons at the fabric store are on little white cards with two to three buttons per card. What a stupid packaging idea. Of course I hadn’t knitted the buttonholes so slipping a button through a hole was out of the question.  Holding those white cards up to the sweater wasn’t very useful. If they really must put the buttons on cards couldn’t they use transparent ones?

Looking for buttons at the yarn store was a totally different
experience. All the buttons are stored in tubes that are easy to open. The clerk encouraged me to lay my sweater on a large table and try on buttons. It’s just too bad that they had nothing in stock that  worked well. Many of the tubes I initially pulled out only had three to five buttons. I was looking for 10.

So now I’ve arrived at the point where I can pick up stitches for the button bands. Of course before I can do that I need to figure out the number of stitches to pick up. This time I decide to use the bottom band as a starting point for the calculations .

Yes, here are more of my quirky math calculations.

1. Measure the front from collar to lower ribbing = 48cm
2. Place bottom ribbing along measuring stick and count how many 1×1 rib stitches in 48cm = 119
3. Count number of rounds in body (from bottom rib to collar) = 161
4. Find pick up rate through trial and error.
161/4 = 40.25
40.25 * 3 = 120.75 (Very close to 119 – so 3 sts out of every 4 rounds will work)

Finding the placement of the button holes was easy  thanks to the formula on page 13 in Sweaters from Camp which is attributed to Mary Rowe.

Pick up and knit

Collar done

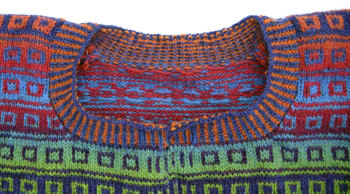
I followed PGR on the ribbing, “pick up one stitch at the end of each of two rows, skip one row, and repeat”.

Starting at center front and using alternating colors, knit the first six extra stitches (steeks stitches) and the next 17 from stitch holder. Pick up and knit 36 stitches (two sts out of three rounds) along left side, knit 34 stitches from holder along back, pick up and knit 37 stitches along right side, knit 17 stitches from holder and then the remaining 7 extra stitches. There is now a total of 154 stitches (141 + 13 extra stitches) on the needle. Work K1,P1 ribbing for 8 rounds but knit the steek stitches. Knit last round with one color and then firmly cast off knitwise with that color.

Initially I did have the same thought about ribbing that Deborah R. mentioned. I measured the gap along the side where I needed to pick up stitches and came up with 17cm. I then laid my ruler across the ribbing at the bottom of the sweater and counted 17cm worth of ribbing stitches. I came up with 43 stitches and then did some math.

17 + 43 + 34 + 43 + 17 = 154 + 13 stitch stitches = 167 stitches total.

Yikes! That seemed like too much. I then checked a few patterns with similar collars (taking into account differences in gauge) and decide on the previous route to avoid getting a floppy collar. Yes, it does look a little floppy in the front but that’s were the button band is going. and besides I tried on the sweater and it looks great.

Deborah, Mt Mom, I didn’t even think of picking up new steek stitches for the collar! Yes, I see how that would also work. Thanks for the suggestion.

Check out Ruth’s current design project – the 4 seasons.

Cuffs are done

Cuffs_2

Thanks for all the encouragement and kind words.

The sleeves will stay as they are.

This week I took a short break to give myself time to think about the sleeves.  At this point I don’t have time to redo anything especially since Jean Wong’s class will be starting in two weeks. Besides, I really do like how it looks.

Collar_startNow it’s onto the collar.

As you can see I’ve only cut the front and back neck steeks and not the one down the center front. There’s a good reason for this.

The other day I was flipping through Feitelson’s book and started reading the Hillswick Lumber pattern because like the Kauni cardigan it has a round neck. This pattern describes how to knit the collar in the round by leaving the center front steek stitches on the needle. What a great idea!

So before I could start knitting the collar (in the round) I had to carefully undo the previously bound off steek stitches and put them on the needle with the other stitches that were on hold.

I started picking up stitches yesterday but then had doubts about the total number of stitches mentioned in the pattern. To get a total of 119 stitches I would have to pick up a stitch every other row on each side of the neck (between the front and back). I seem to remember hearing that stitches picked up along rows should be done at a rate of 3 stitches out of every four rows. PGR’s book (Knitting in the Old Way) says to pick up 2 stitches out of every 3 rounds (rows) for ribbing. If I followed PGR, then I would need a total of ~142 stitches. I’m once again at a point where I need to mull over the situation before proceeding. Not sure what I’ll do.

AngelDuring my short break from the cardigan I started working on Evelyn Clark’s Angel Lace Shawl. It looks like a big blob now but wait until it’s finished. It’s so easy to work away on this that I almost forget that I need to finish the cardigan. For me, Evelyn’s patterns are worry free. At least there are no concerns about fit.

Right arm doesn’t match the left

Right arm & almost done

The right arm  is almost finished despite not knitting for a few days while recovering from an awful cold.

I don’t get very many unsolicited comments about items in progress from my husband but yesterday he asked if the arms of this sweater are suppose to be so different. Befuddled and not sure how to respond, I think I answered, “Why does it look odd?” He responded, “One of the sleeves has more orange than the other.”

Unlike the body, I didn’t think much about how the colors combinations on the sleeves would turn out. I just started the left sleeve with yarn from where I left off with the shoulders. Of course his comment started to haunt me and I soon started jotting down possible color combinations with the yarn left after doing the body (assuming I hadn’t started the sleeves).

The follow questions and responses came to mind.

  • Can I knit both the sleeves with the same color combos?
    Nope, there’s not enough yarn with those colors.
  • Should I start with new color combos, like purple and yellow?
    Maybe, but I don’t think I want to take that route.
  • Is there a way to either lessen the orange or balance each sleeve with a bit of orange?
    This could be possible.

So as I consider my options I’m finishing the right sleeve and will possibly reknitting the left one so that there will be less orange in that one.

Responses to questions

Karen asked about teaching my niece to knit and her reaction to the yarn/toy store.

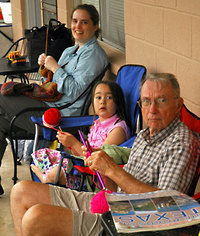
Teaching her went quite well considering she’s six years old. Her mother and father were amazed to see her sit and concentrate on one thing for a couple of hours. I casted on the stitches, showed her the movements a few times and then gave her the needles. At first I guided her hands but it wasn’t long before she was knitting by herself. I don’t think this was the first time she had done this because she mentioned that her friend has knitted with her before.

I’m not sure whether she’ll keep it up because the next day she didn’t ask about doing it again. I think six might be a little young to start.

I also forgot to mention that we drove to the Frio in a different car so she wasn’t with me when I bought the yarn and needles. That’s probably a good thing. Not sure what would have happened if we took the two children into that shop. Actually it was lunch time and Grandpa was really hungry so it was a very quick stop. The guy ringing up my purchases suggested a great BBQ joint a few blocks down at the junction of highway 46 and 87. It’s a combo meat market, BBQ restaurant and Shell gas station called Riverside Supermarket! We ate our lunch at one of the tables between the produce and meat case and enjoyed watching the locals line up to place orders. The sliced beef sandwich was so excellent taht we stopped by again on the way back to Austin.

Deborah asked, “How would you compare the length of color change in Kauni with, say, Noro Kureyon or Silk Garden?”

Kauni color changes are much longer than Kureyon or Silk Garden. I don’t know how much longer because I haven’t yet attempted to measure one of the colors in my skein. I’d guess at the length but I don’t think I’d be very accurate. Since the colors gradually change from one to the next, it would be hard figure out where one colors begins and ends.

Frio river outing

Knitting by the Frio riverLast weekend was the family outing to the Frio river. The weather was mostly overcast with light rain. That’s OK because even though the sun wasn’t out, it was about 10 – 15 degrees warmer than the previous week back home. With the weather being a bit cooler than anticipated I was able to continue working on the cardigan and even finished the left arm.

Just as I arrived I found out that my niece was ready to try knitting and wanted me to teach her. On the way from Austin to the Frio we kept an eye out for a yarn store and were lucky to find Ewe & Eye along the way. It’s a nice little store that’s also has a rather large toy section.

Jojoland Melody

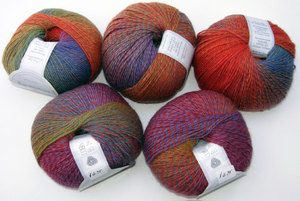
While I was there to quickly grab some needles and yarn for a beginner I couldn’t help but take a quick look at all the yarn. This Jojoland Melody popped out at me. It’s a variegated yarn in rainbow colors similar to Kauni. While the colors are similar, I’m not sure how long the color changes are. Also this yarn is plied with three different colored strands that  form a noticeable barber pool affect. Not sure how it would look knitted up or if it would work as a replacement for Kauni.

Left arm

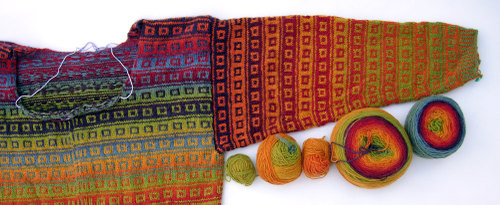
So, here’s what I got done. Please ignore the wrinkles. It was rolled and stuffed into my carry on bag.

I’m not so sure I like all that orange and green towards the bottom half of the sleeve but I’ll leave it for now.

I wasn’t sure about the sleeve length so I cut the extra stitches on the front and back neck to make it easier to try on the cardigan.

As you can see I lined up all the yarn that’s left – 240 grams worth. That’s what’s left of the 520 grams I had when I started. Not sure if I mentioned this but I’m making the medium sized one with the body shortened a few centimeters. Should be plenty to finish the other sleeve and the rest of the ribbing.

Mystery yarn & picking up stitches

One of the next steps after finishing the body of the cardigan is to use a sewing machine to sew two lines zig-zag stitches on either side of the middle stitch of each steek.

Use my sewing machine?

Can’t remember the last time it’s been used. Considering the pile of stuff that’s accumulated around it, I’m sure it hasn’t been used for a couple of years – maybe even since I took up knitting in earnest. Instead of clearing my sewing area, I started spinning and got so caught up that I didn’t stop until I filled two bobbins.

Woolgatherings - Corriedale

It’s that roving I pulled out of storage last month. It was purchased from Woolgatherings at the Black Sheep Gathering a few years ago. I love the colors but have been too intimidated  to dive right in. Handling the colorful Kuani yarn has inspired me to give it a try. I’m hoping that splitting the roving lengthwise – one piece for each bobbin – will work out OK.

Zig zag stitchesMid-week my sewing machine emerged from the clutter and I managed to sew the zig-zag stitches as the pattern mentions. I’m not sure if this is necessary. My past two FI patterns didn’t mention doing this, but I though I’d give it a try. Kauni doesn’t seem to be as “sticky” as the VY wool I used for the Firebirds cardigan and the Roscalie vest so it’s probably a good idea.

After sewing the zig-zag stitches on each section of extra stitches (front, back and armholes), I grafted the shoulders together with a piece of orange yarn.

Begin left arm

Next, I cut the extra stitches (steek) on the upper left side before picking up stitches for the left sleeve.

This time I came up with a quirky calculation to figure out how to pick up the stitches evenly.

1. Measure the row gauge from the start of the armhole to the shoulder. Turns out I’m getting 8.5 rounds per inch.

2. Since 8.5 is a fraction I doubled it to get 17. That is, 17 rows for every two inches.

3. The stitch gauge is 6 stitches to the inch so I doubled that to get 12 stitches for every two inches.

4. From the last two steps I now know my pick up rate – 12 stitches within every 17 rows.

5. After sifting through several number combinations to find a pattern that will match my rate of 12 stitches in 17 rows, I settled on the following.

Following the rows on the body, *pick up 2 sts in every row, skip 1 row, pick up 3 sts in every row, skip 1 row, pick up 2 sts in every row, skip 1 row, pick up 3 sts in every row, skip 1 row, pick up 2 sts in every row, skip 1 row*. Repeat from * to * until 114 stitches have been picked up around the armhole

By the way, there’s another online shop that will ship Kauni to North America. It’s Astrid’s Dutch Obessions and the website is in English. I haven’t ordered from her before so I can’t vouch for the service but I have seen her postings on Knitter’s Review under “Sales and Shop News”. I’m glad that there’s one more source out there for us on the other side of the pond.

Sorry that I have no review of Jean’s DVD. I finished watching it this weekend and started a post but couldn’t get back to the computer tonight to finish it. I should have it ready Wednesday.


Answers to comments:

Frances, I don’t consider myself a fast knitter, especially since I’m quick to rip out anything I don’t like. I might seem fast because I tend to work on one thing at a time and try to fit it into my schedule whenever possible.

KarenJo, I haven’t taken Peg McNair’s class but it sounds interesting. I’ll have to check into that. Thanks.

Working front neckline

body done

Confused about how to work the decreases and extra stitches near the front neckline? Here’s what I did.

Work until knitting measures one row short of 44-48-52 cm.

First Round: Assuming that the beginning of the round starts at the middle of the extra stitches (steeks) on the front; bind off the left half of the extra stitches on the front and continue following the pattern as set until the last half of the extra stitches. Bind off those stitches. Once this round is finished all extra stitches at the front have been bound off. Break working yarns.

Second Round: Place first 15-17-17 stitches on holder. Cast on six extra stitches (first half of extra stitches) alternating colors as needed. Now following the pattern as set continue knitting until 15-17-17 pattern stitches remain in this round. Place these stitches on a holder. Cast on seven extra stitches (remaining extra stitches) alternating colors as needed. There are now seven extra stitches on the right needle and six on the left.

Next Round: Knit the first six extra stitches as set. Next, knit the first two pattern stitches together  (k2tog). Continue knitting the round, following the pattern as set until two pattern stitches remain. With these two stitches work a SSK decrease. Now knit the last seven extra stitches as set.

Following rounds: Continue working decreases every other round, until a total of 7 stitches have been decreased on each side of the extra stitches.

Neckline

Sorry I didn’t have time to finish watching Jean’s DVD this week so, no review as promised. Maybe I’ll find time to work on it this coming week.