Dutch Heel

Despite my fondness for socks with short row heels, I’ve decided to stick to the pattern which, calls for a traditional heel flap and Dutch heel for these Estonian socks. The rugged heel stitch used on the flap is continued while turning the heel, making it quite a durable heel. The end result is a very square heel.

whisper Rib instep After the heel was turned, I picked up stitches along the heel flaps and readjusted so that each round now starts at the back of the heel. Since the lace pattern is symmetrical I could easily place each half on one circular.


I couldn’t resist showing the last bit of wheel spun yarn I did on Monday night. I got tired of white and purchased some blue New Zealand roving.

blue_handspun2

The Ashford wheel went back yesterday for the second and final class. We started off by trying a bit of lovely creamy white Corriedale and then focused on learning how to pick out a good fleece. It will be a while before I bring another fleece home since the last one took weeks to clean by hand. Washing it in a machine wasn’t an option since I have a front loader.

At the end of the class I tried the Lendrum folding wheel and noticed quite a difference right away. It was so much smoother then the old worn Ashford that I used this past week.

Ok, so I’m giving in. I put my name on the list for the next shipment of double treadle wheels. The teacher says that it’s been taking a while to get the wheels so it will probably be a 6-7 week wait. In the mean time I’ll finish the whisper rib socks.

half whisper lace Here’s what they looked like when I set them aside. Since I only have three size 0 circulars, one is on two circulars and the other is on one circular. I figured it would be better to work on both at the same time in case my tension changes overtime. Last year I knitted some gloves one at a time and noticed a difference in the tension between the two. If I knit a pair at the same time at least they’ll turn out looking the same.

Merino

After spinning 8 ounces of “Gertrude”, a mixed roving of romeny / north country cheviot / cotswold from The Bellwether, I built up enough confidence to try merino . Unlike the coopworth shown in my last post, merino is smother and harder to control. The picture on the right shows some merino that I spun on a wheel. For a comparison, I picked up my hand spindle and produced the yarn shown on the left.

merino_spindle.jpg merino_wheel.jpg

I’m coming to the conclusion that although a drop spindle might appear to be more difficult than a wheel, I can actually produce more consistent results on a drop spindle. I’m finding it hard to control the flow of fiber into the wheel while drafting out the fiber at the same time. When I spin with a drop spindle every thing goes much slower. If I find a slub (fat spots) then I can stop and fix it. If the spun fiber seems to have too much twist then I can stop and transfer some twist into the unspun fiber. It’s much harder to troubleshoot these kind of problems when using a wheel.

Spinning Neophyte

wool_compare Can you tell which skein is from a wheel and which is from a drop spindle? The one on the right was spun with my drop spindle this summer and the one on the left is what I produced after my third attempt with a wheel. Now the teacher said not judge whether we like wheel spinning based on our first attempts because more then likely it will be frustrating and tiring. Hey, that’s what I always tell folks about snowboarding.

Tuesday I was able to bring home a double treadle Ashford Traditional Saxony for practice. Yesterday was my first solo attempt, which wasn’t too pretty in the beginning. Although I haven’t tried other wheels, I already don’t like this one. I’m having trouble moderating my speed. If I go slowly the treadles tend to get stuck but when I try speeding up I have trouble controlling the fiber. Next Tuesday I’m going to see if I can try a Lendrum folding wheel. This one seems much more practical for my lifestyle. The teacher was using a Schacht which might be another option but it is much more expensive then the others.

Unless my spinning gets much better this weekend I won’t be spinning my merino. It was totally unrealistic to think that I could produce acceptable sport weight merino yarn after only a few attempts.

Short Rows & Shoulders

Marianne saw my pictures on how to do short-row wraps and asked for help on with short-rows on shoulders.

My first suggestion was to pick up The Knitter’s Book of Finishing Techniques by Nancie M. Wiseman. It has the best description of how to do short rows for a three-needle bind off. She does a much better job of explaining this than I can, but I’ll give it a shot.

When working short-row on shoulders you’ll need to do the opposite of what the directions tell you. Instead of binding off stitches at the beginning of a row, you’ll put the stitches at the end of the row on stitch holders. Here’s a chart that I made while working on the back of the Tea Tree sweater.

shoulder

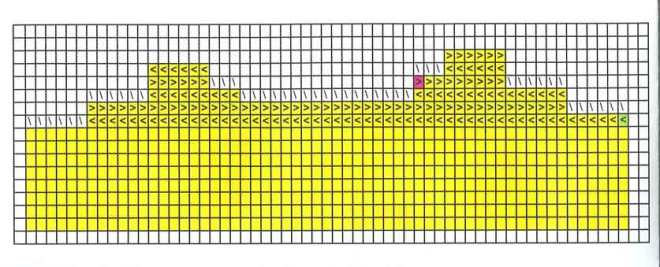
Here’s a key to the chart.

\ = stitches on holders

< = knit side

> = purl side

green = start of shoulder shaping

pink = start with new piece of yarn

Now keep in mind that this chart also shows a neck edge that has short rows instead of being bound off. The next time I use this technique I might try binding off the neck stitches instead. I remember having trouble with holes when I tried to knit the collar band.

So here’s a step-by-step blow of what I remember doing. I usually try to knit while I write directions but right now I’m too busy spinning to get out my needles.

Begin shaping at green cell on the chart and work up.

Row 1: start on the knit side and knit to the last six stitches, wrap the stitch and turn

Row 2: purl to the last six stitches, wrap the stitch and turn

Row 3: knit 15 stitches, place 17 stitches on holder, knit to the last six stitches, wrap the stitch and turn

Row 4 (left hand side) : purl to last three stitches, wrap the stitch and turn (leave three collar stitches on holder)

Row 5 (left hand side): knit last six stitches and continue working down the shoulder to the armhole, remembering to hide the wraps.

Now go back to left hand side and start with new yarn.

Row 4 (right hand side): purl to last six stitches, wrap the stitch and turn

Row 5 (right hand side): knit to last three stitches, wrap the stitch and turn (leave three collar stitches on holder)

Row 6 (right hand side): purl last six stitches and continue working down the shoulder to the armhole, remembering to hide the wraps.

Ok, so there you go. I need to get back to the spinning wheel since I only have it for a week. Spinning is so much more difficult then knitting.
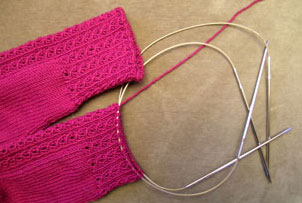
Lessons Learned

top down pullover The top down pullover is officially finished.

I’ve got to admit that while I will wear the sweater, I don’t think it will end up being one of my favorites. It has however provided an opportunity to learn from mistakes that will help improve future projects. Here’s what I’ve learned.

  • Debbie Bliss Cashmerino creates a very soft fabric that tends to get fuzzy and pills easily. It is more suitable for baby clothing that will only be used for one season but not for a sweater that should last for several years.
  • Don’t assume that the sweater will fit like the picture in the pattern. The woman who modeled this sweater in the magazine must be a size 2 while the sweater that she’s wearing a size 10. The actual fit is much tighter than shown. From now on I’ll check measurements more carefully before starting a project.
  • The biggest advantage of knitting from the top down is the ability to try on the garment as it progresses and make adjustments if necessary. However, this is only an advantage if washing and blocking doesn’t need to be taken into account. Cashmerino relaxes when washed so I was never sure whether it was going to fit properly.

Last Inch

Only an inch or so to go!

td_almost_done.jpg

Next week I’ll be spinning up a storm.

Don’t worry Lily, I’ll finish your socks before I start another knitting project.

I’m currently reading Aran Knitting by Alice Starmore. Wow, what a great book. The aran pattern samples are simply amazing. I can’t decide whether to knit Na Graga or Irish Moss for Paul.

Snugging Stitches

After reading my posting about shaped cap sleeves Sarah asked, “what do you mean by snugging stitches?”

Since I find it hard to explain I decided to take a picture.

snug_short_rows.jpg

After I’m done knitting the sleeve cap and knit one row in the round, I stop and tighten up the first row of stitches that were picked up around the armhole. This is done using a knitting needle and gently pulling on the backside of each of the picked up stitchs to transfer the slack from one stitch to the next. In the picture, I drew black lines on the next few stitches that will be pulled. As I tug on a stitch the last stitch will get tighter and the current stitch will get bigger. The last stitch will end up being a big loop that I can tighten by pulling on the end of the yarn. Voila, all the stitches are tighter. Just be sure not to make them too tight.

Sarah also asked if a set-in sleeve and a cap sleeve are the same thing. That’s a good question. In my mind they are the same thing but I might be wrong. I know that “set-in” is the sewing term used to describe the sleeves on a typical men’s suit jacket or dress shirt. That’s the type of sleeve that I’m trying to, more or less, mimic in my current sweater project.

KIP on the Ferry

I almost finished the second sleeve while on a short weekend trip to Orcas Island but ended up ripping out most of what I did when I realized that some of my decreases were not correct. I could have probably let it go but I’m too much of a perfectionist. I will however get this sweater done by next Sunday before I start spinning class.

ferry.jpg

I wish I could say that I knitted the sweater that I wore in the picture but I didn’t. It’s from Icelandic Design.

The Question

My husband finally posed the question, “when are you going to make me a sweater?” My reply was, “oh, I’ve got to finish the current sweater project before I can start a new one.” So now I’m on the hunt for the perfect men’s sweater pattern.

We both like the collar on this one from Bergere De France. Their current catalog also has some other good possibilities. I’ve also looked through several books but nothing really jumped out at me. Good men’s patterns seem few and far between.